Setting Up a Dataform Repository in Google BigQuery

Create a new Dataform Repository in BigQuery
Dataform is a development environment built to manage SQL-based data workflows in BigQuery. It helps you structure, test, and document your SQL in a more organized way, similar to how software engineers work with code. Instead of manually creating tables and views in BigQuery, you can define them as files in a version-controlled project, making your workflows easier to maintain, share, and scale.
With Dataform, you can:
- Organize SQL transformations into a clear project structure
- Use GitHub for version control and collaboration
- Automate testing and documentation of your queries
- Schedule executions for production environments
By combining Dataform with BigQuery, you move from ad-hoc SQL scripts to a managed, collaborative, and production-ready workflow.
The first step in getting started with Dataform is to create a repository. A repository stores and manages all your Dataform project files, it’s essentially the home for your code and configurations.
To create a repository in Dataform we will go through the following steps:
- Prepare a Service Account
- Create a new Dataform Repository
- Create a new GitHub Repository
- Create a Secret Token that will be used by Dataform to connect to GitHub
- Link Dataform with GitHub using the Secret Token
- Write a sample SQL query and run
Prepare a Service Account for Dataform
Before creating your first Dataform repository, you need to set up a service account in Google Cloud that Dataform will use for all its actions.
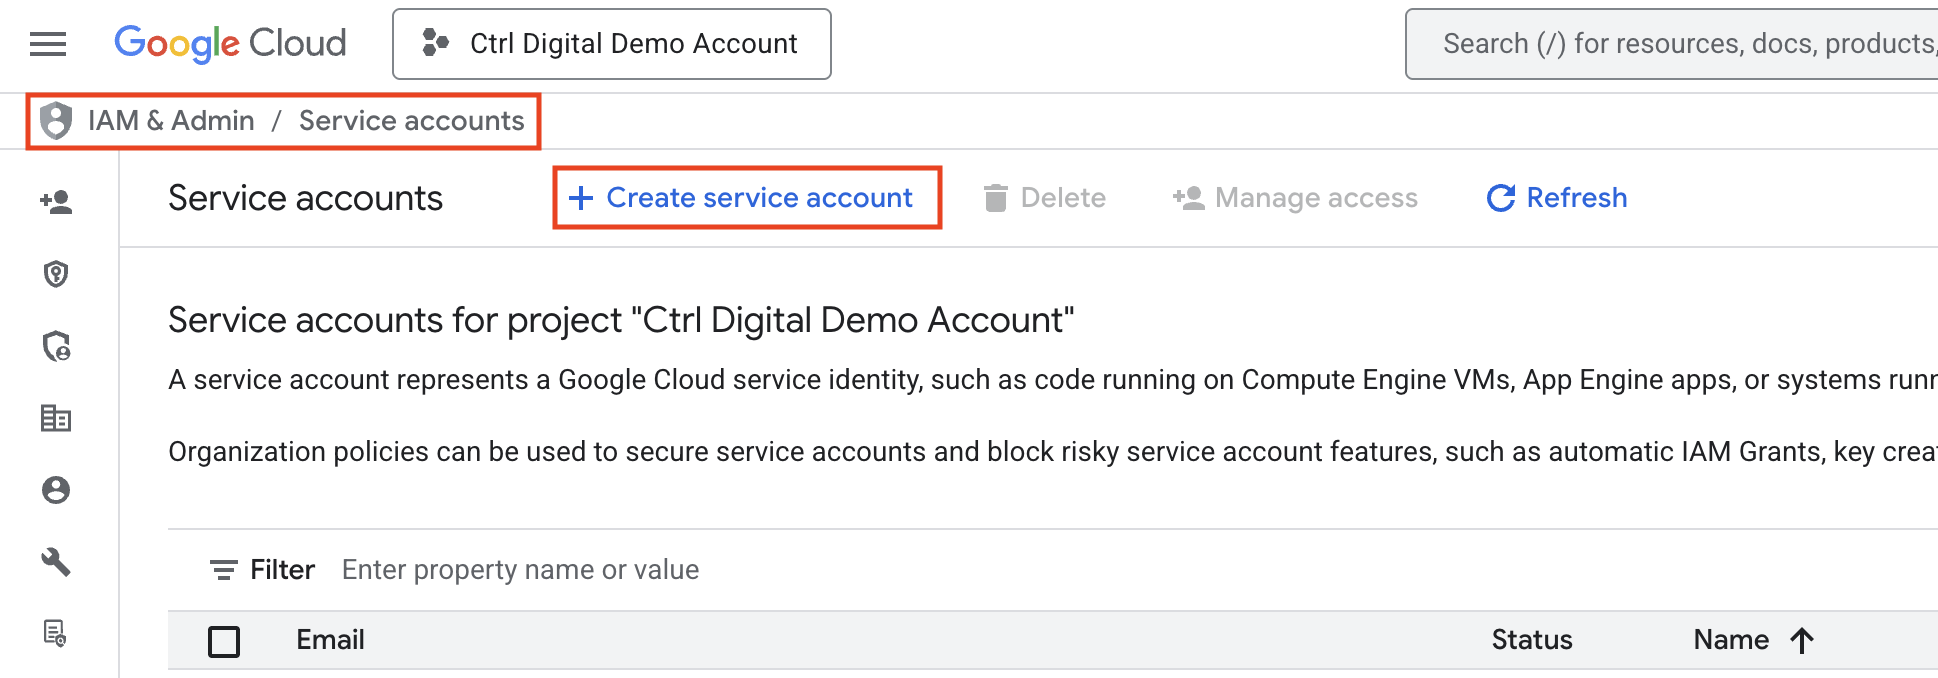
Go to IAM & Admin in the Google Cloud Console
Click Create service account
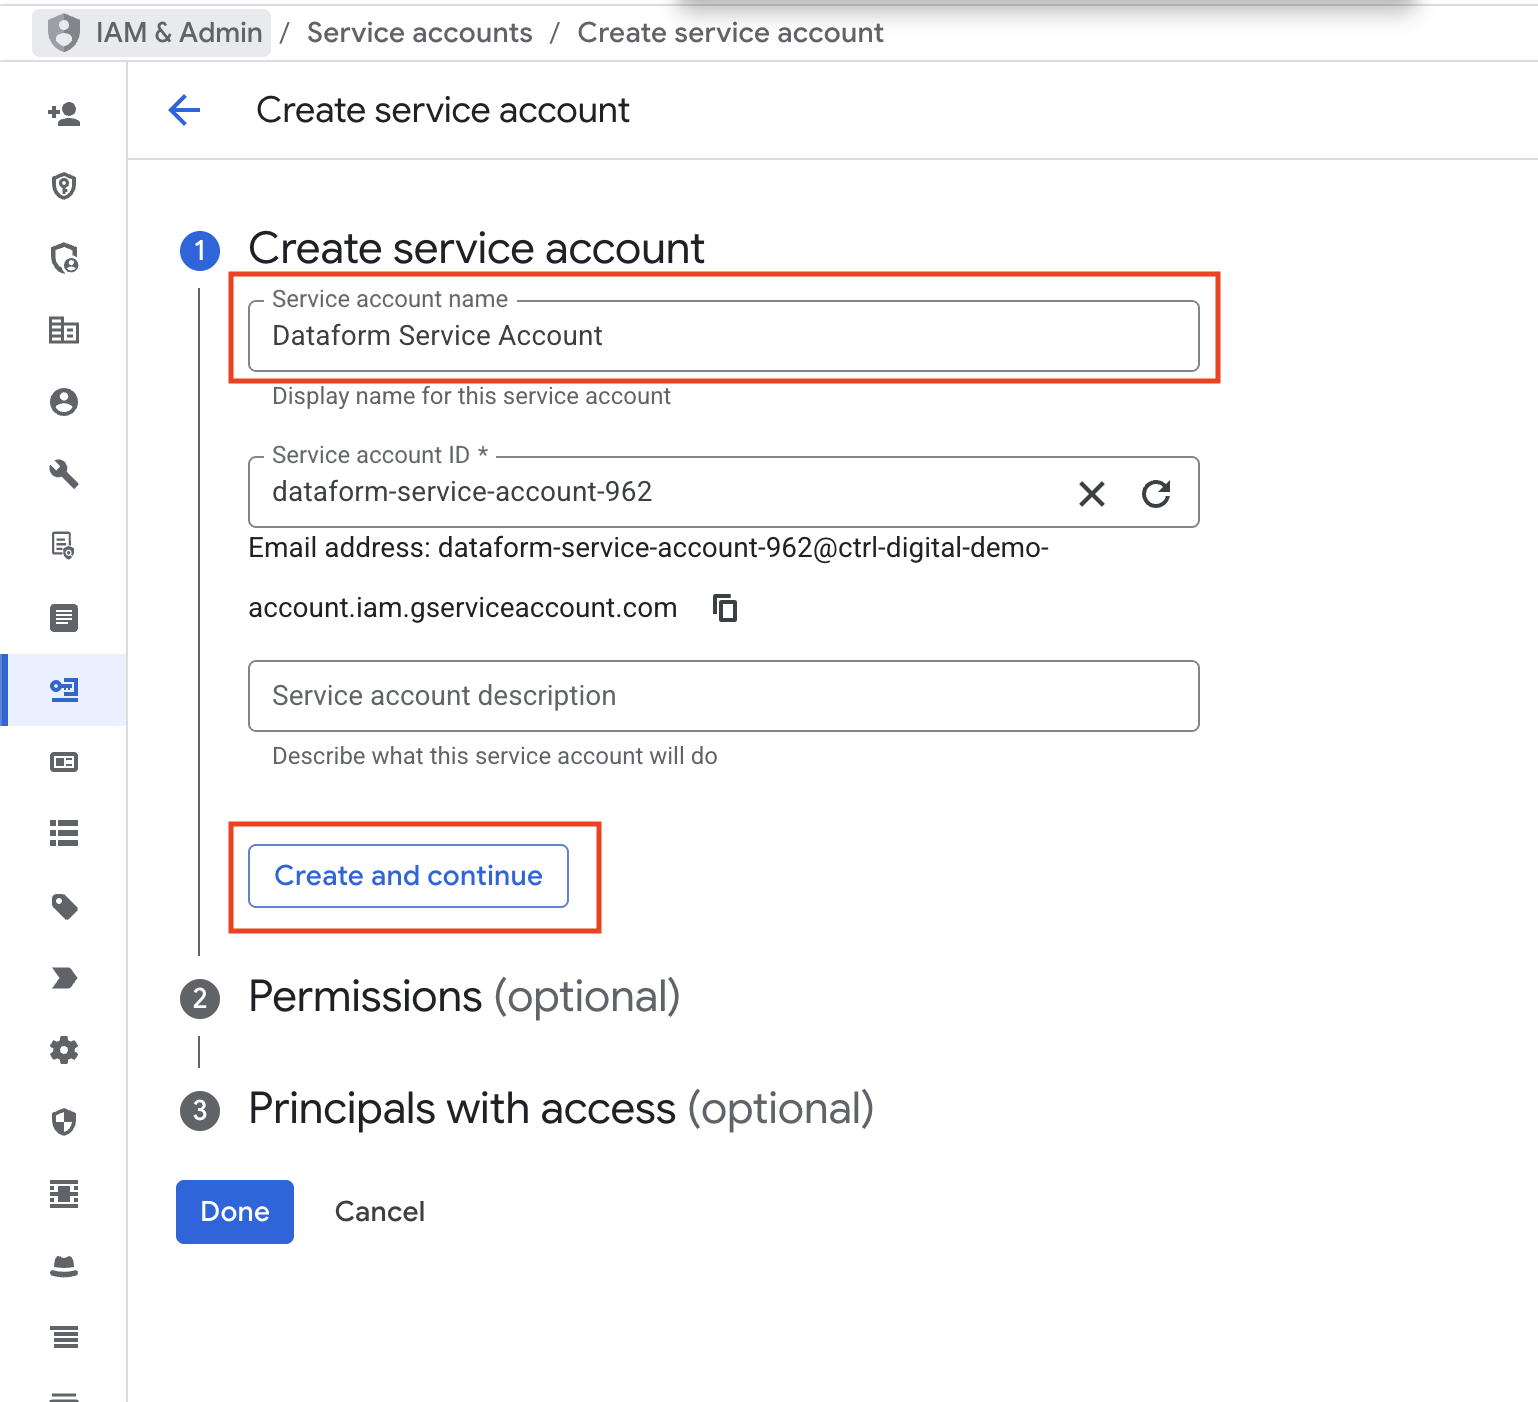
Give the new service account a clear, descriptive name Click Create and continue
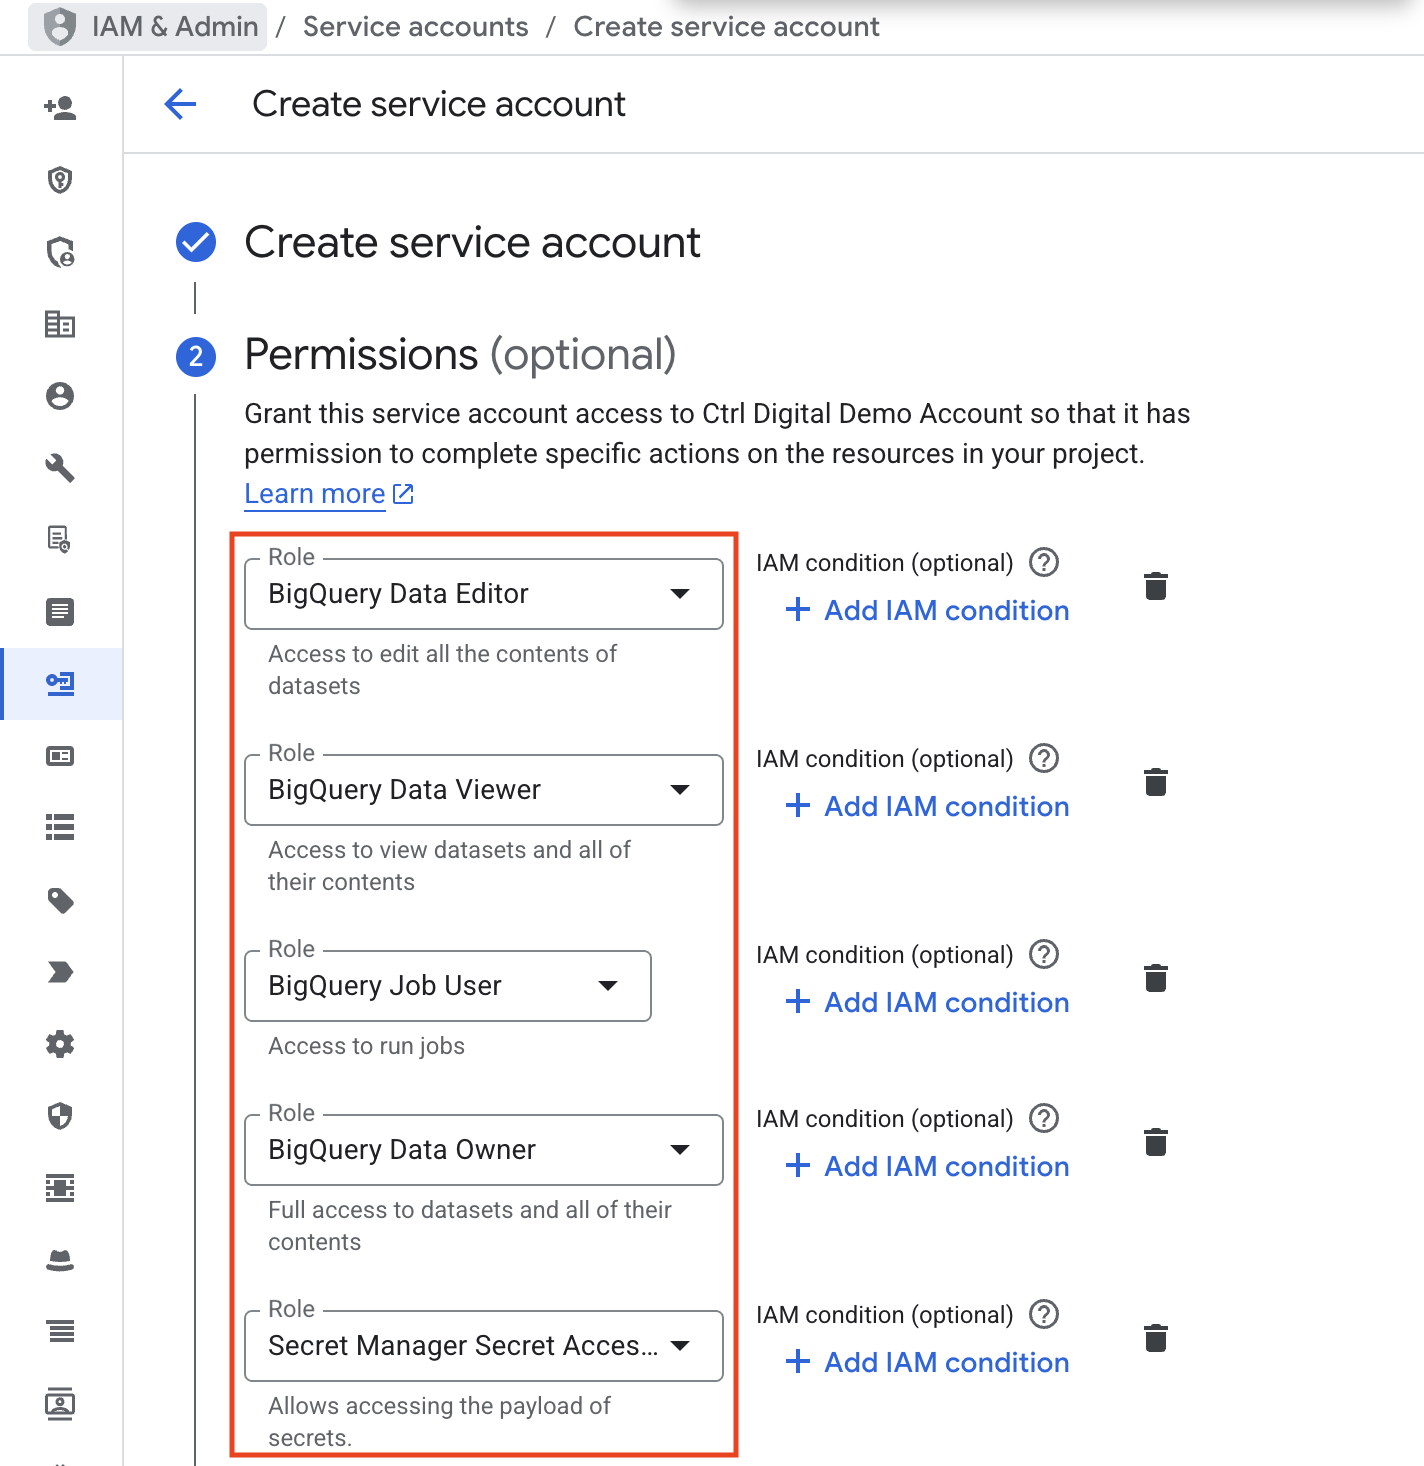
Next, we need to give the service account the right roles. The roles BigQuery Data Editor, BigQuery Data Viewer, BigQuery Job User, and BigQuery Data Owner are required so the service account can access datasets and run SQL queries in BigQuery.
We also need to add the role Secret Manager Secret Accessor. This is necessary when connecting the Dataform repository to GitHub, since it manages the GitHub access token.
Finally, click Done and verify that the new service account has been created successfully.

Navigate to Dataform UI and enable Dataform API
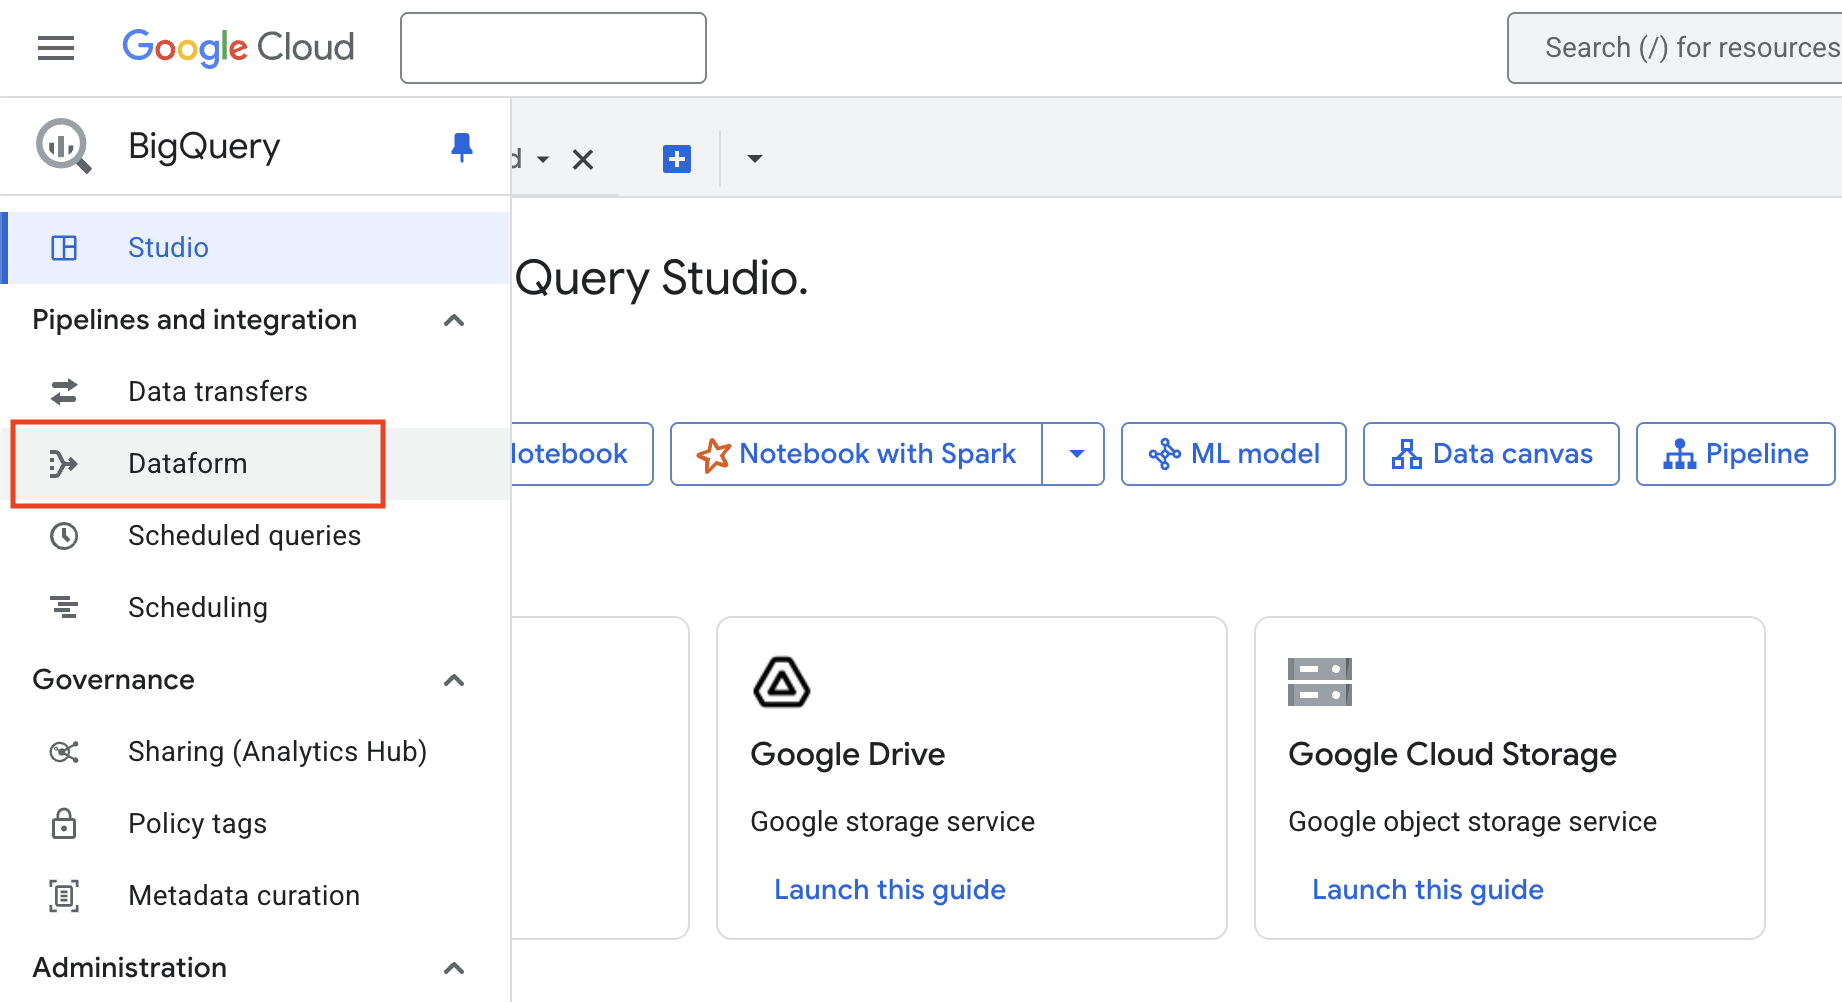
Log in to your Google Cloud Platform account and go to the BigQuery console at https://console.cloud.google.com/bigquery/
In the menu on the left, select Dataform. If this is your first time using Dataform, you will need to click Enable API before continuing.
Create a New Dataform Repository
In Dataform ,click Create Repository to begin.
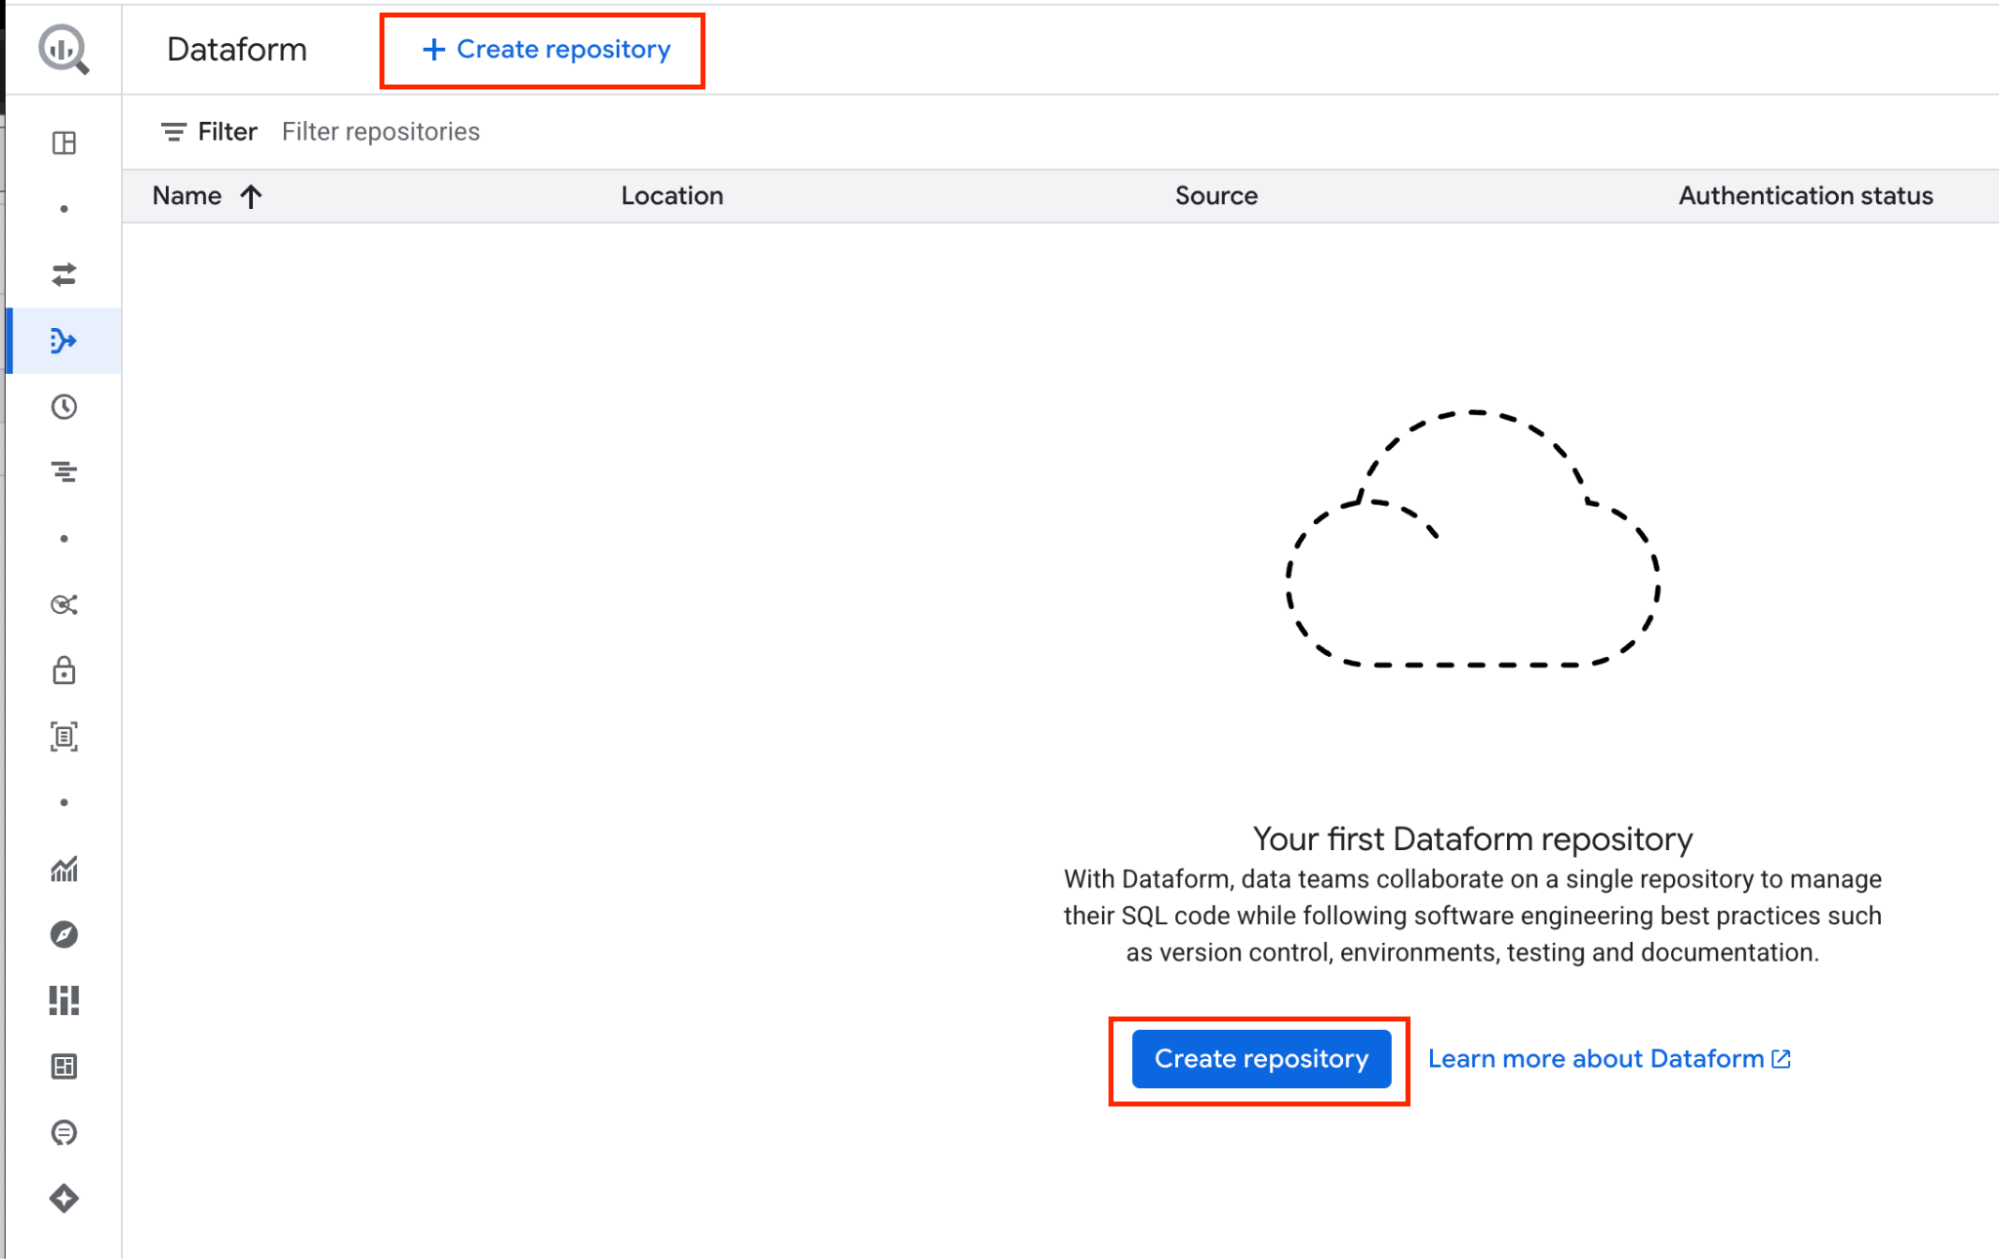
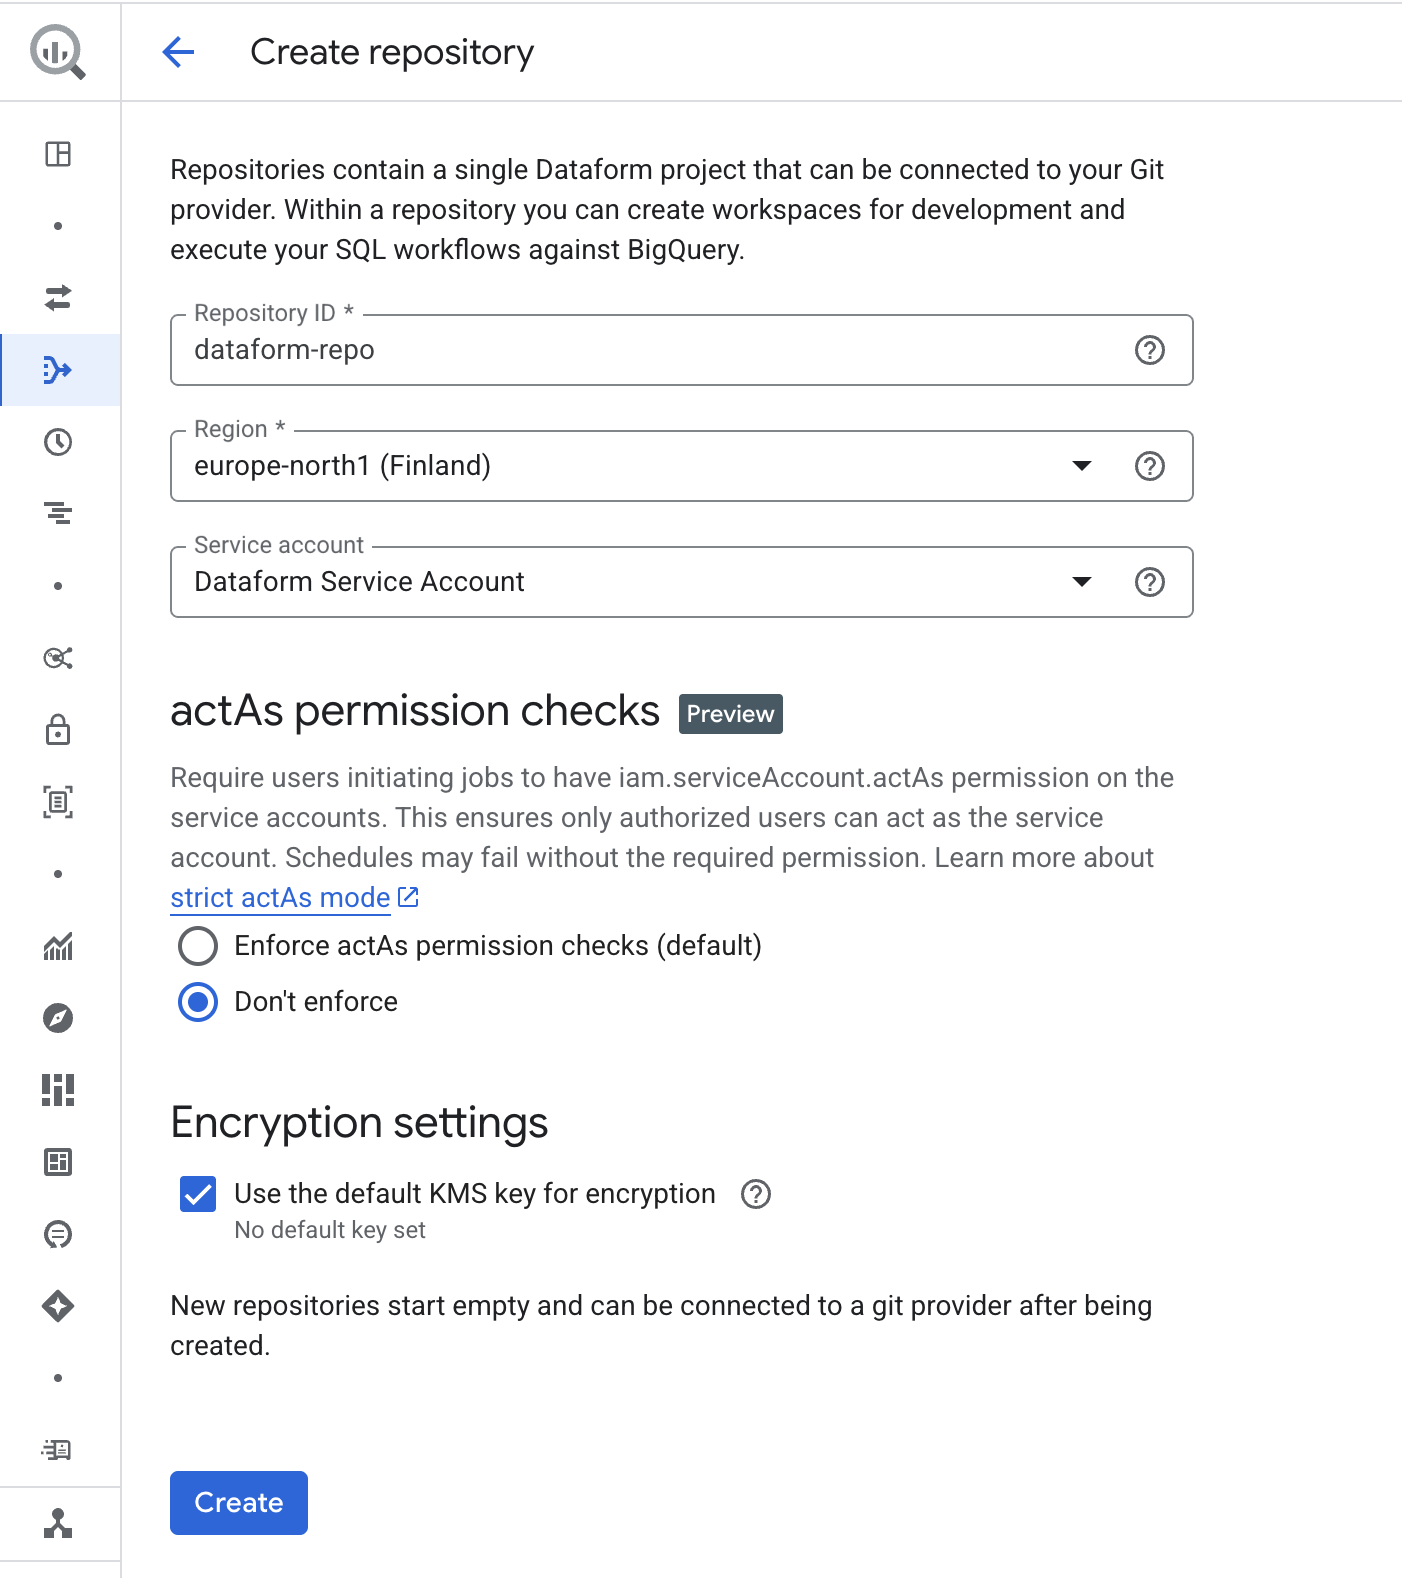
For Repository ID, choose a name that clearly describes your project. In this guide, we will use the name dataform-repo.
For Region, select the location where your repository workspace files and data will be stored. This cannot be changed later, so the easiest approach is to use the same region as your BigQuery data.
For Service account, select the one you just created rather than the Default Dataform Service Account.
For ActAs permission checks, choose Don’t enforce. If you require extra security you could use actAs, which would require some extra steps for IAM setup.
For Encryption settings, keep the default encryption.
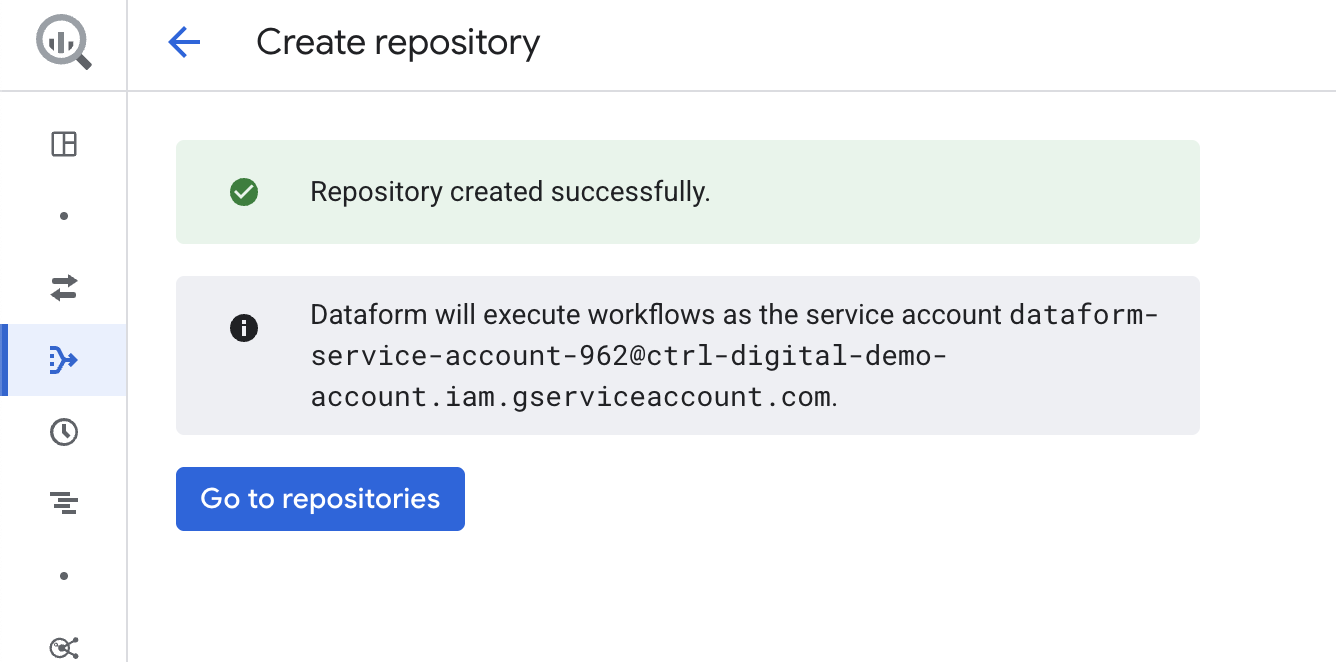
Click Create. After a short loading time, a success screen will appear. You can then confirm that the new service account is set as the default.
Click Go to repositories. You will now see the new Dataform repository named dataform-repo.
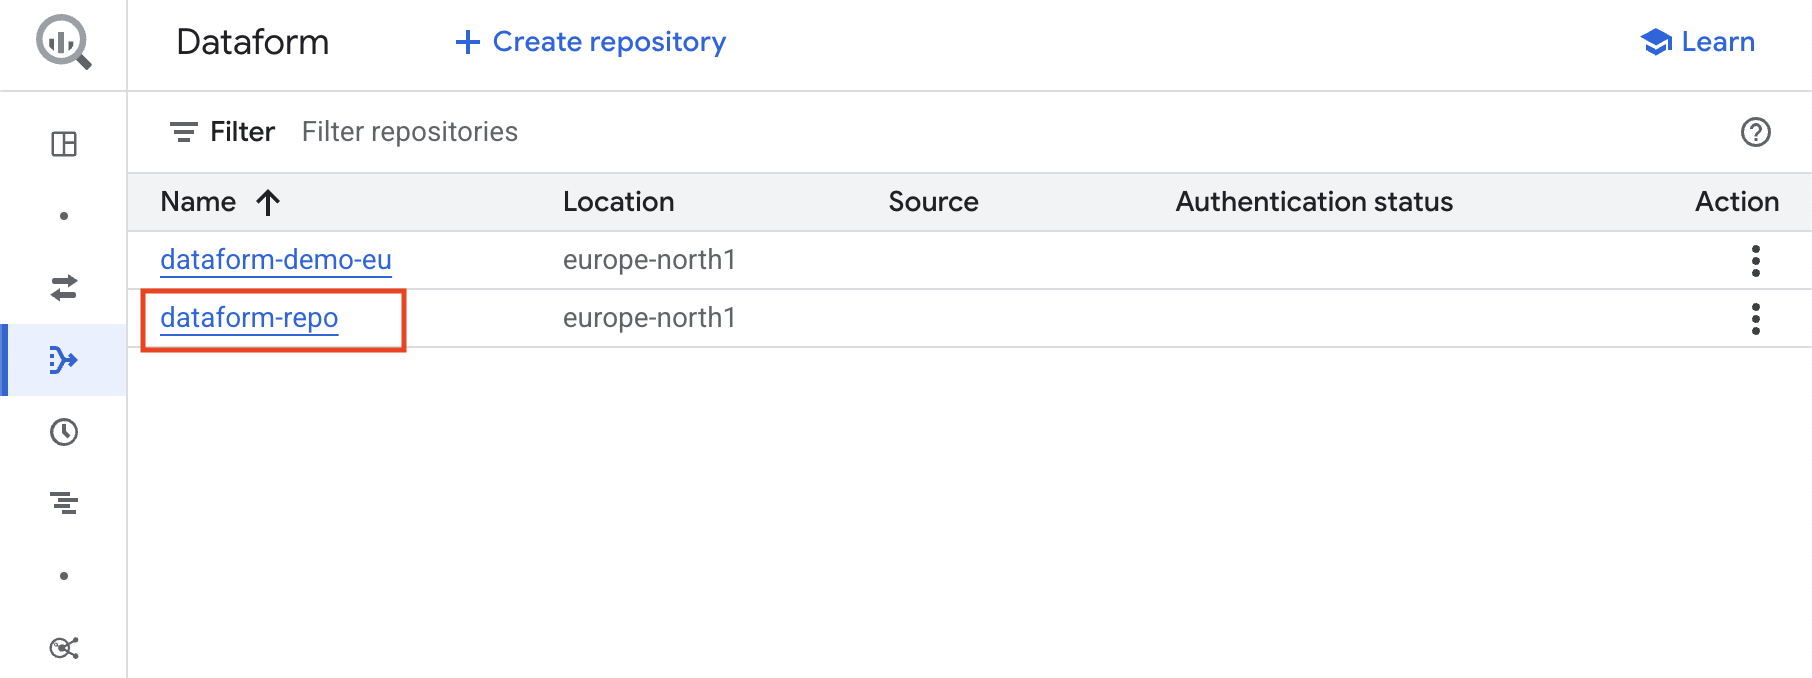
Click on the repository name dataform-repo to open and enter your new Dataform repository!
Connecting your Dataform repository to GitHub
Next, you need to create a new GitHub repository to store your code files and manage version control for your Dataform repository.
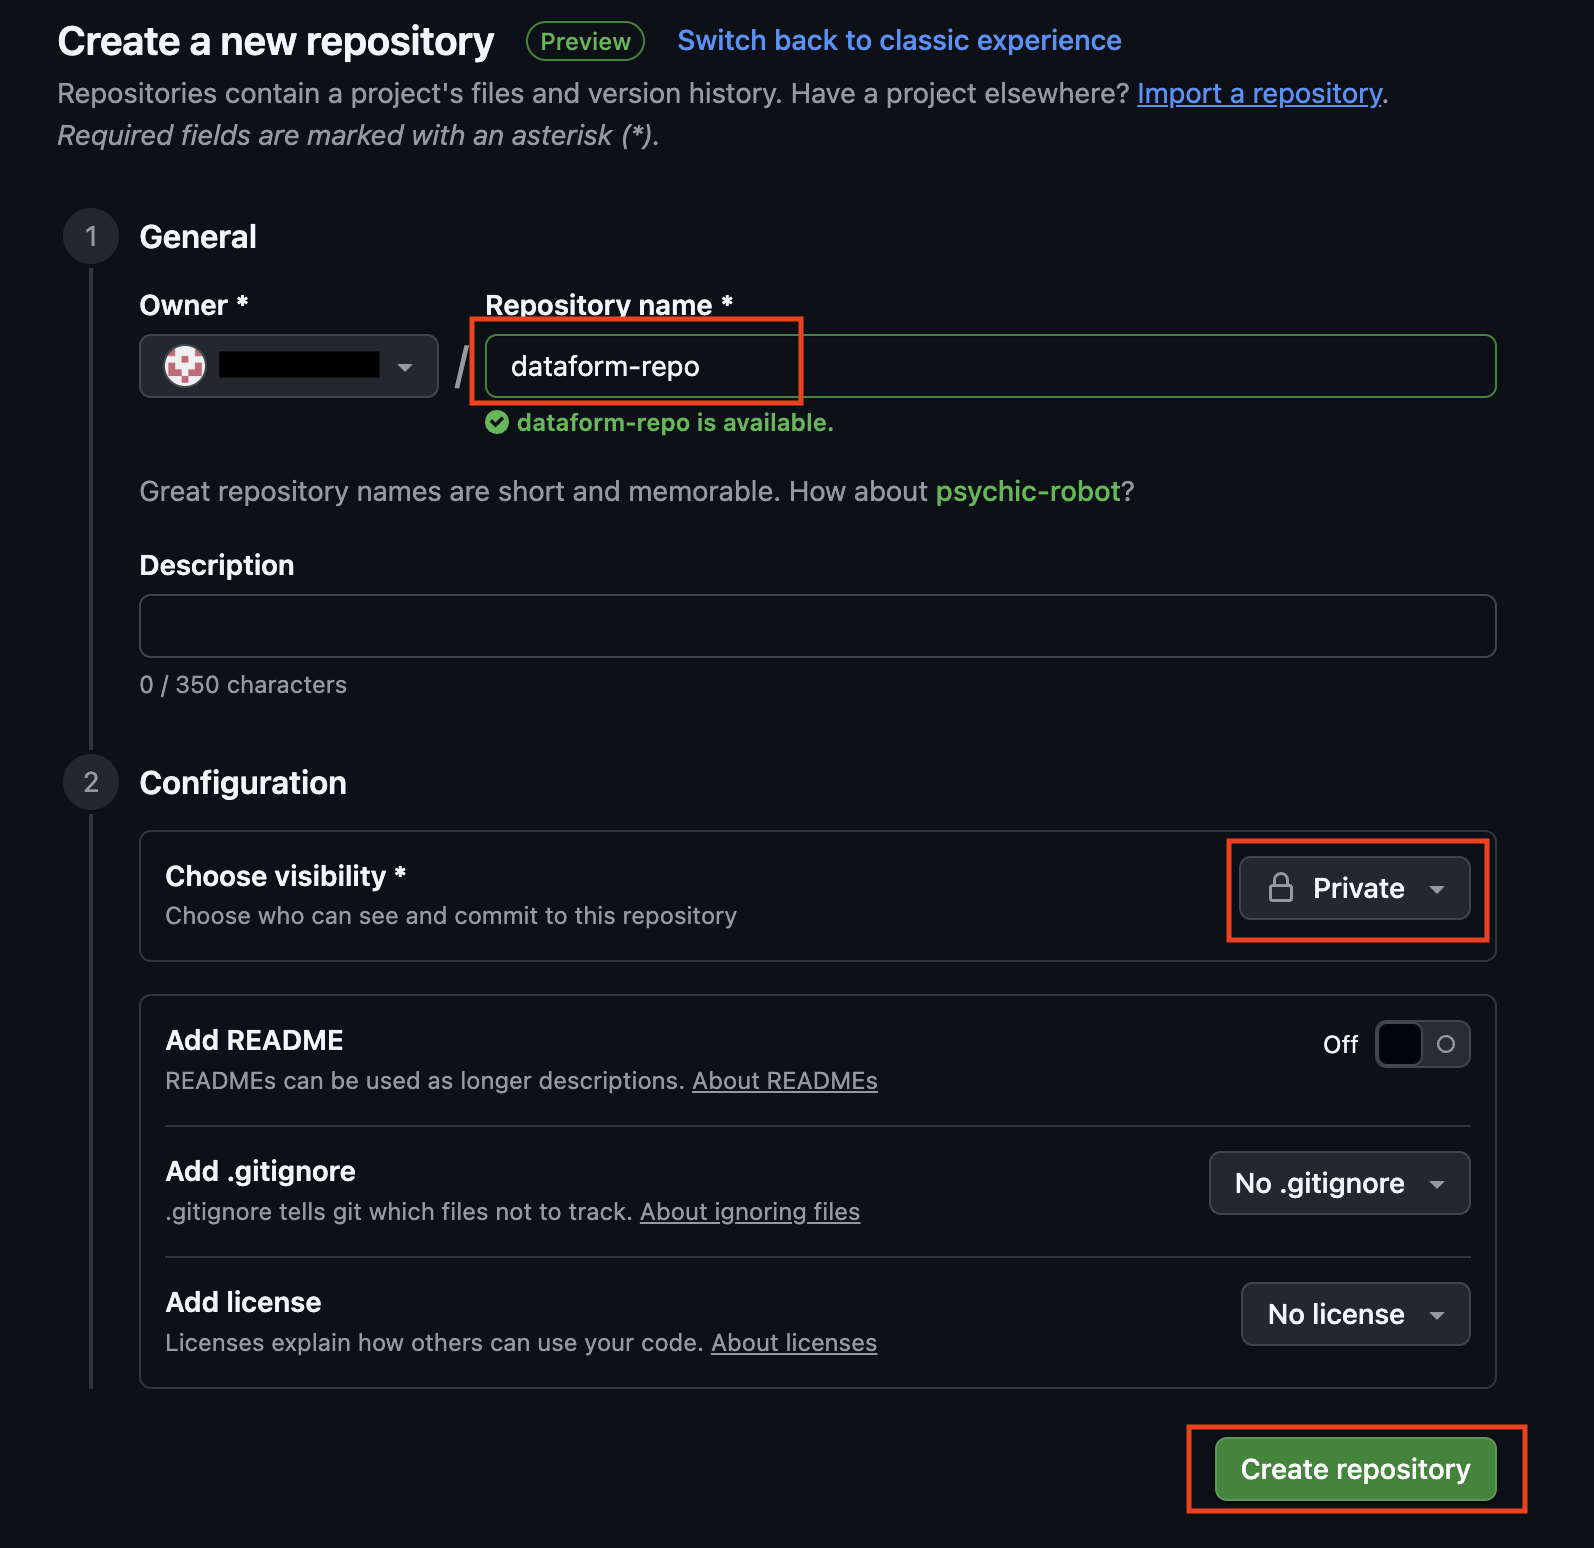
If you don’t already have a GitHub account, start by creating one. Once your account is ready, create a new repository in GitHub.
Give your new GitHub repository a suitable name, set the repository to Private.
Success!
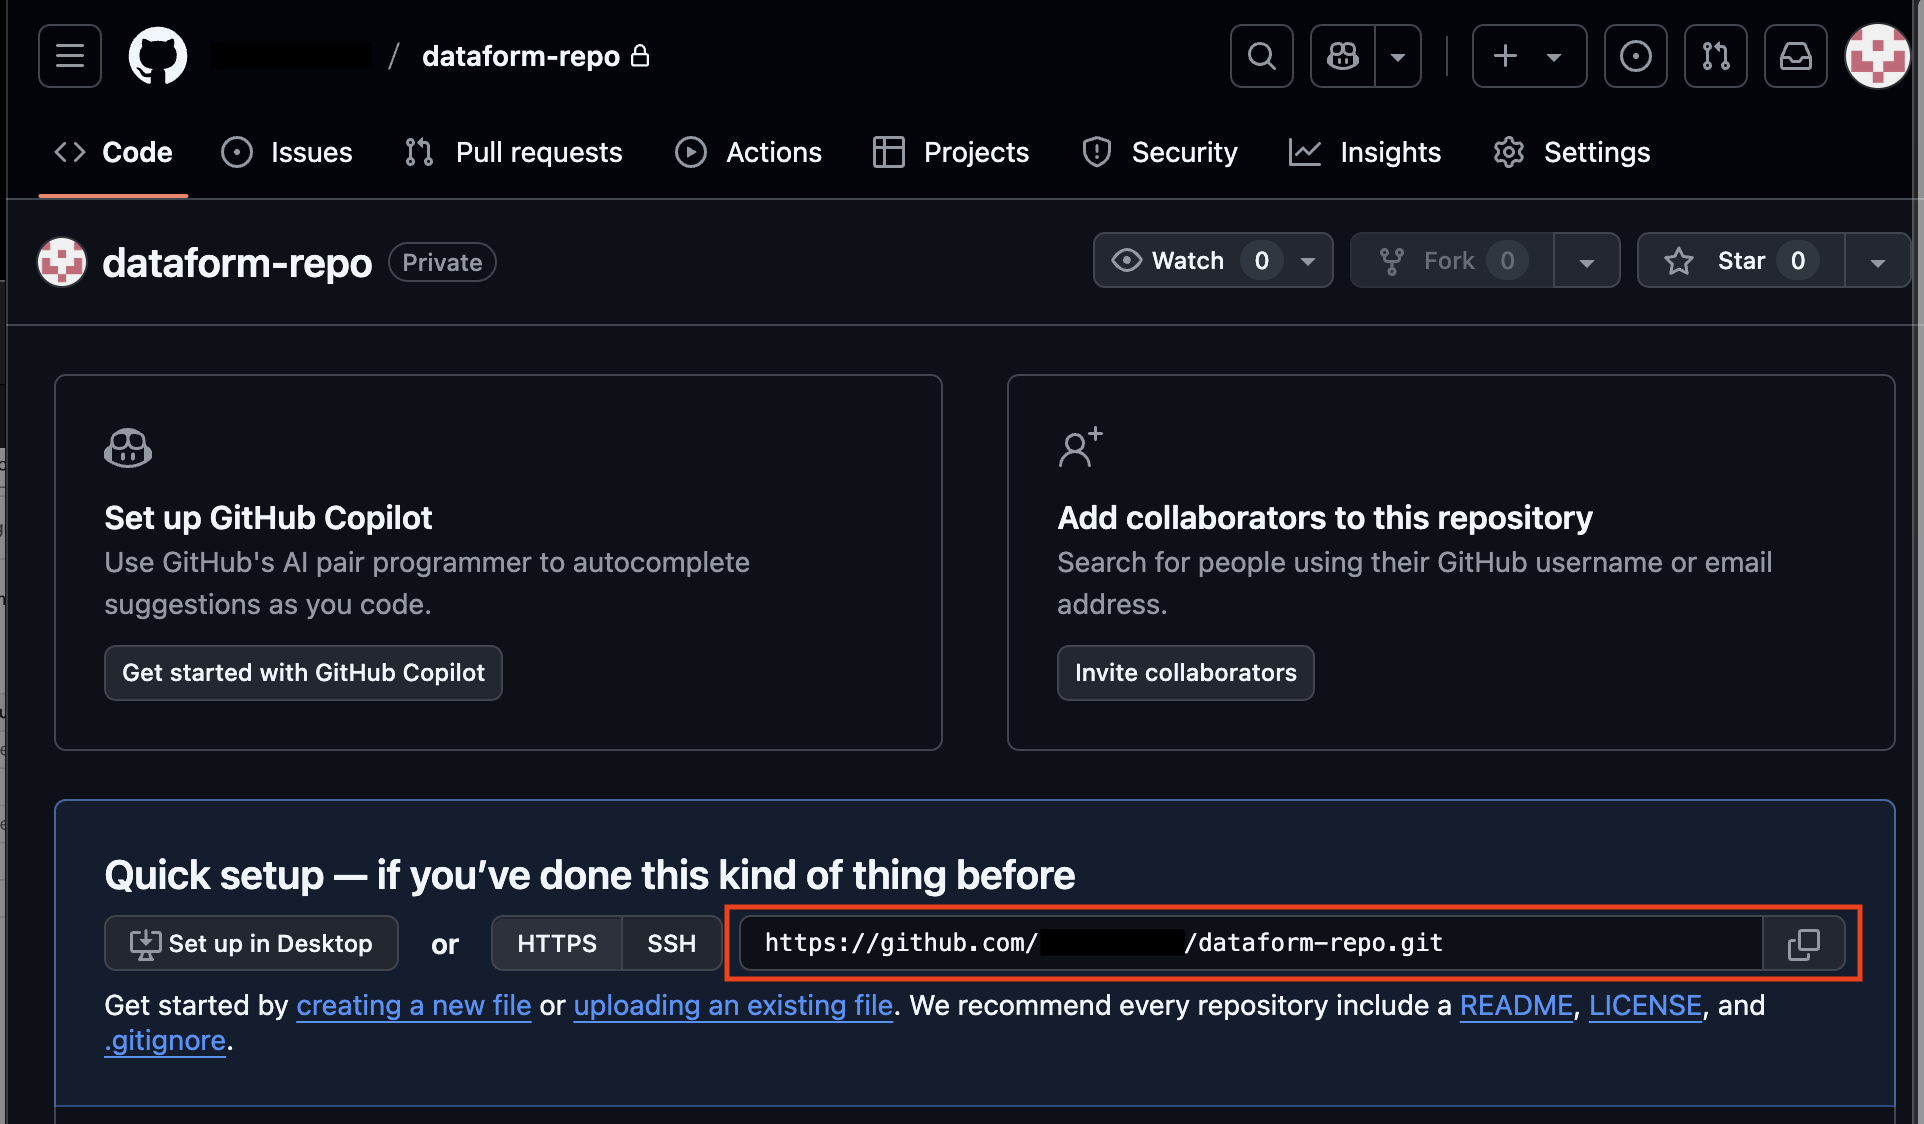
Copy the Git repository URL (for example: https://github.com/your_github_profile/dataform-repo.git). You will add this to your Dataform repository so it can connect to GitHub.
Create a GitHub Secret Token
Next we will create a GitHub Secret Token, that Dataform will use to be able to access our GitHub repository.
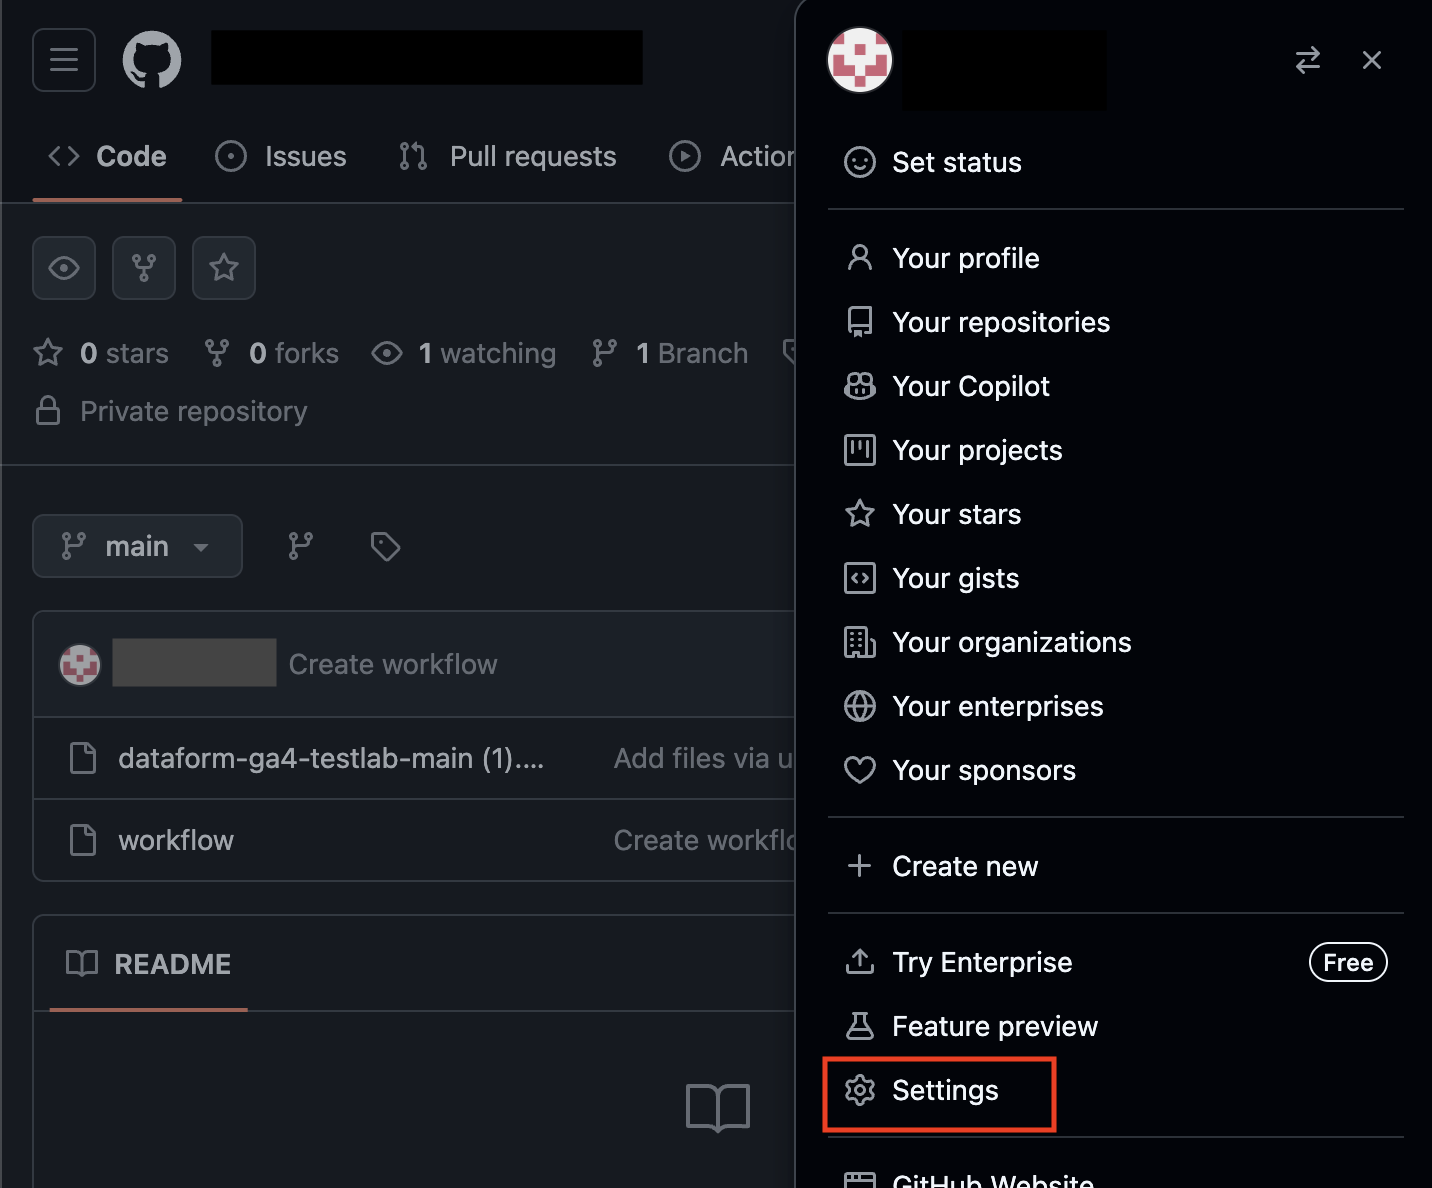
In GitHub, click your profile icon in the top-right corner and go to Settings.
In the menu on the left, down in the bottom, select Developer settings.
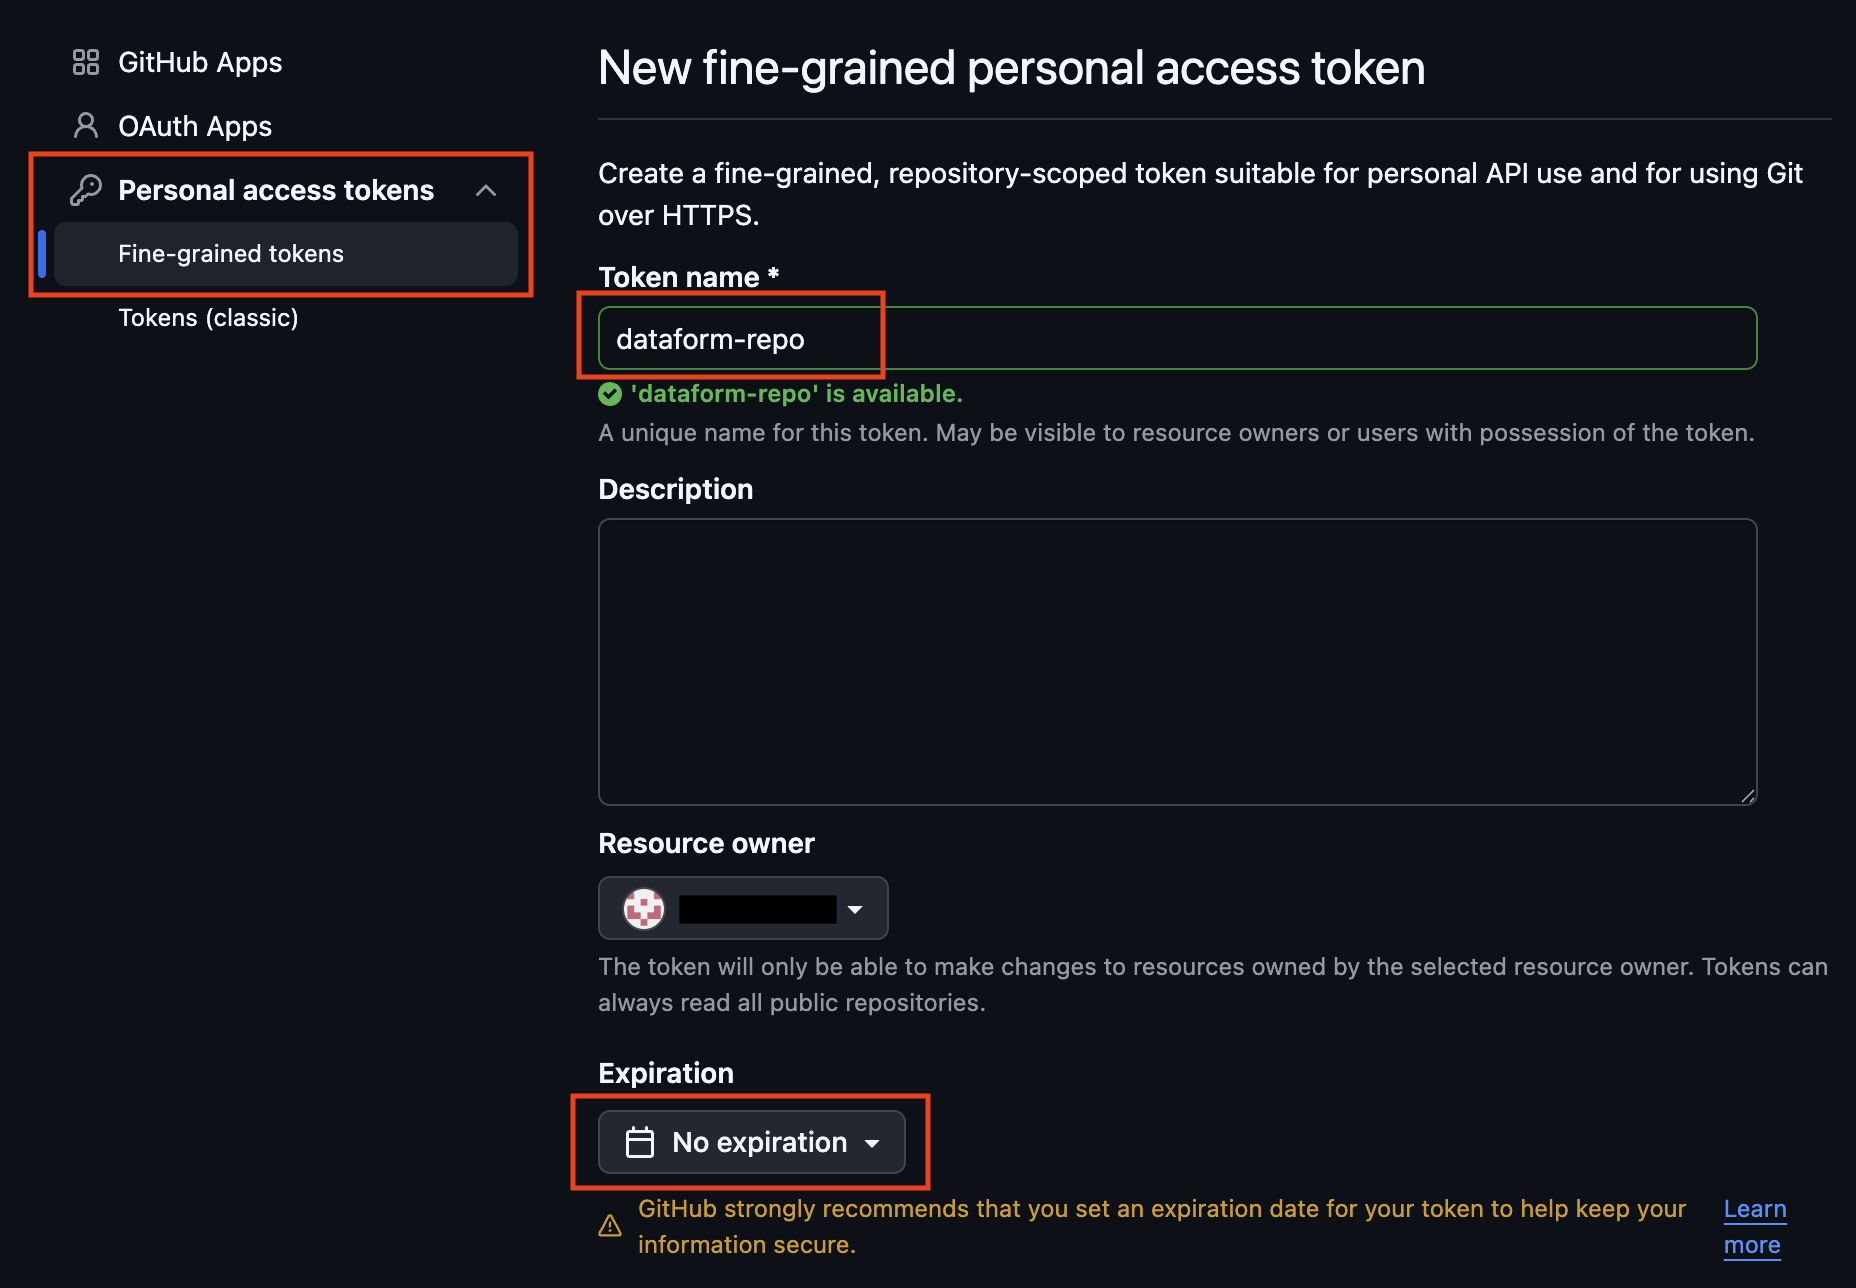
Under Personal access tokens, choose Fine-grained tokens, then click Generate new token.

Give your new token a suitable name. Set an appropriate expiration time. In this demo, we will use No expiration for testing. In production, you should set an expiration and rotate the token regularly for better security.
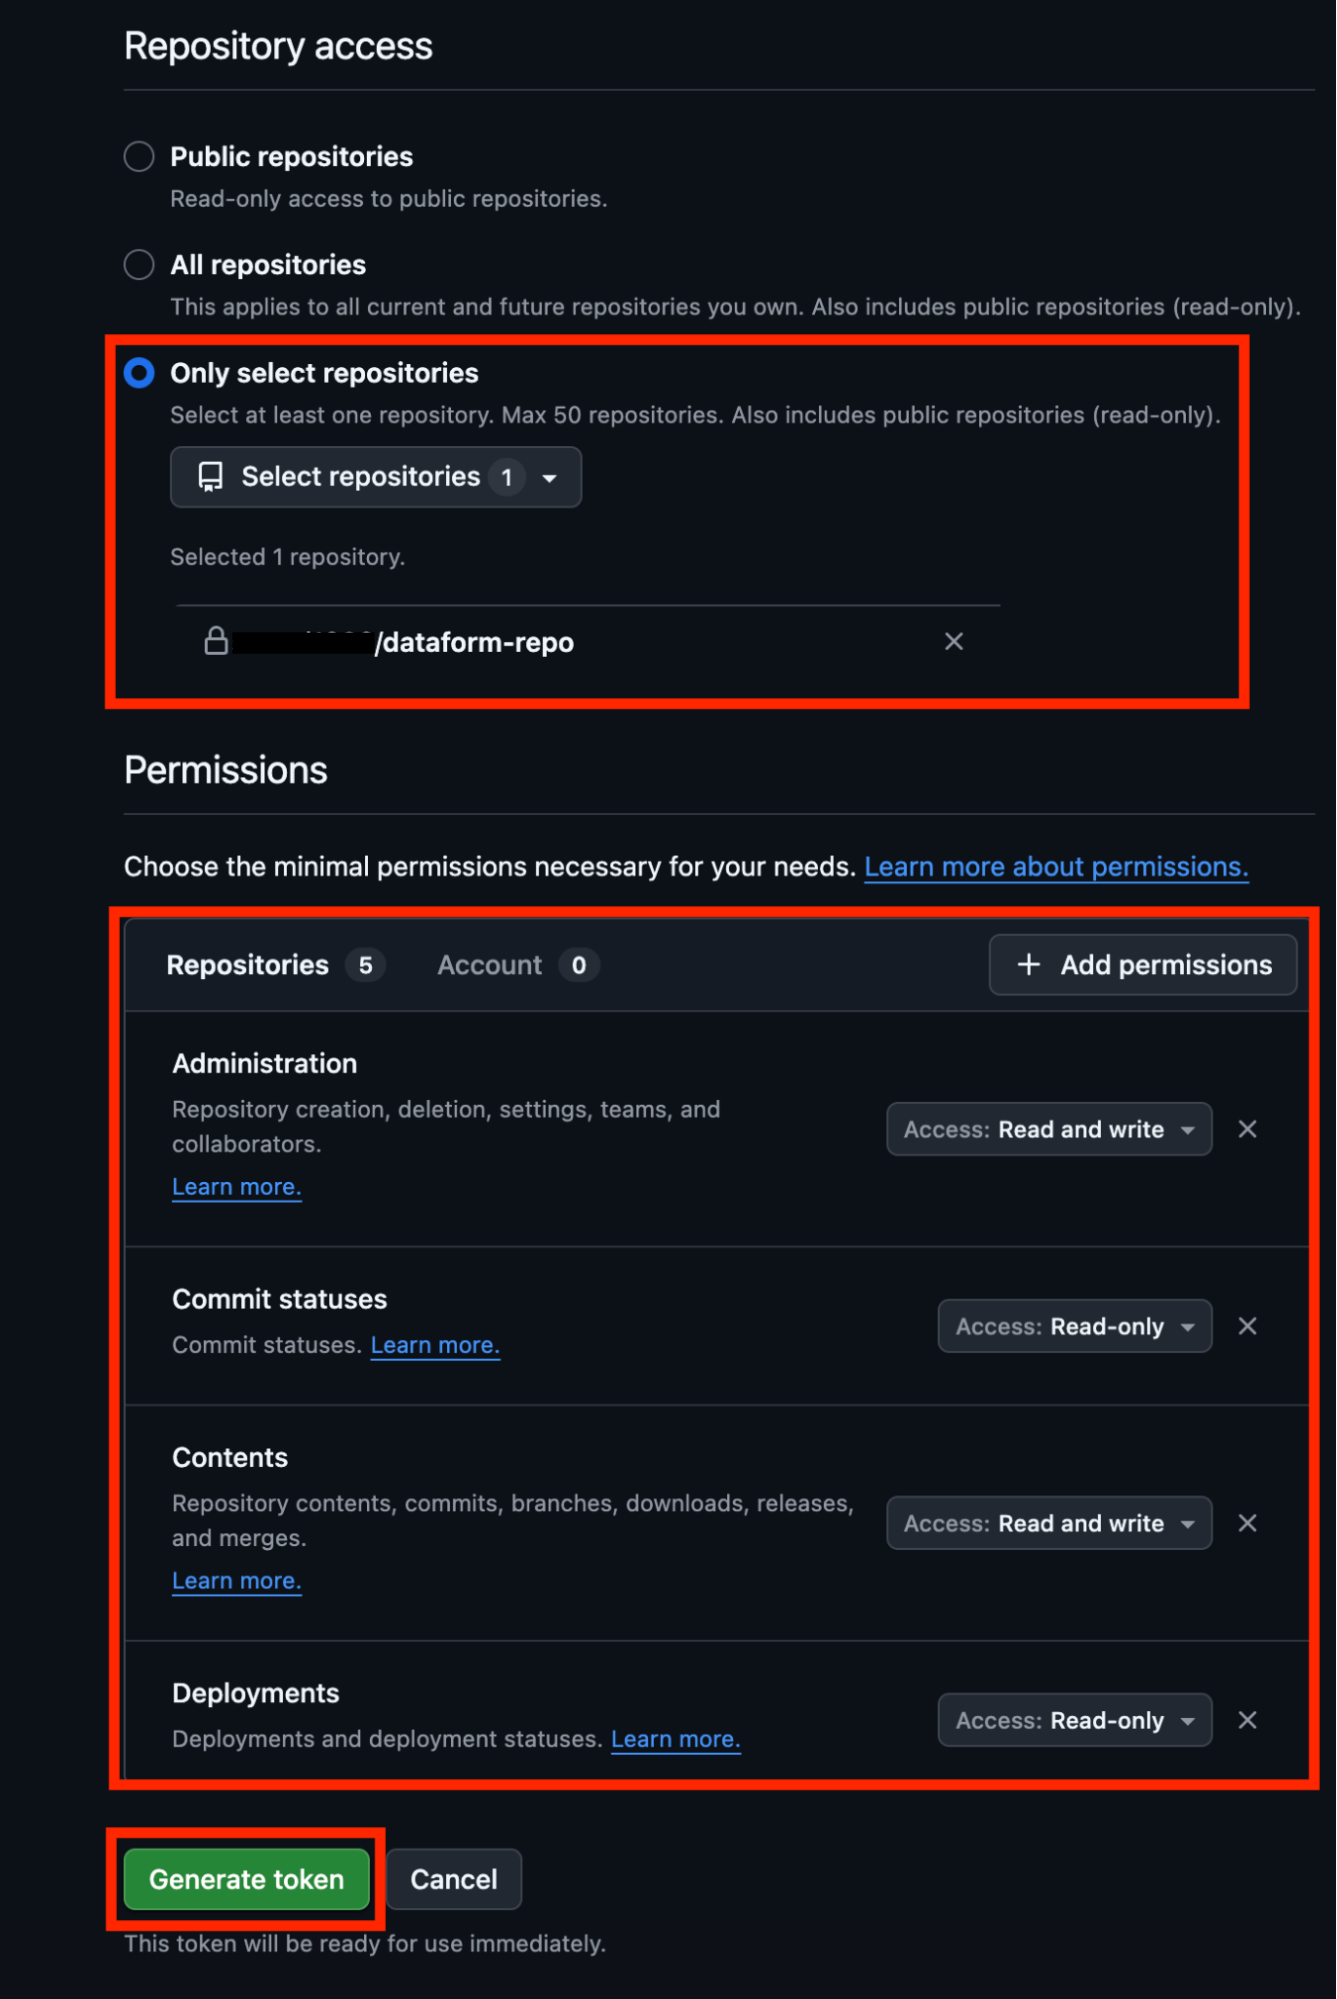
For Repository access, choose Only select repositories and select the GitHub repository you just created.
Set the required permissions for the access token so Dataform can connect:
Administration: Read and write
Commit statuses: Read
Contents: Read and write
Deployments: Read
Finally, click Generate token.
Success!
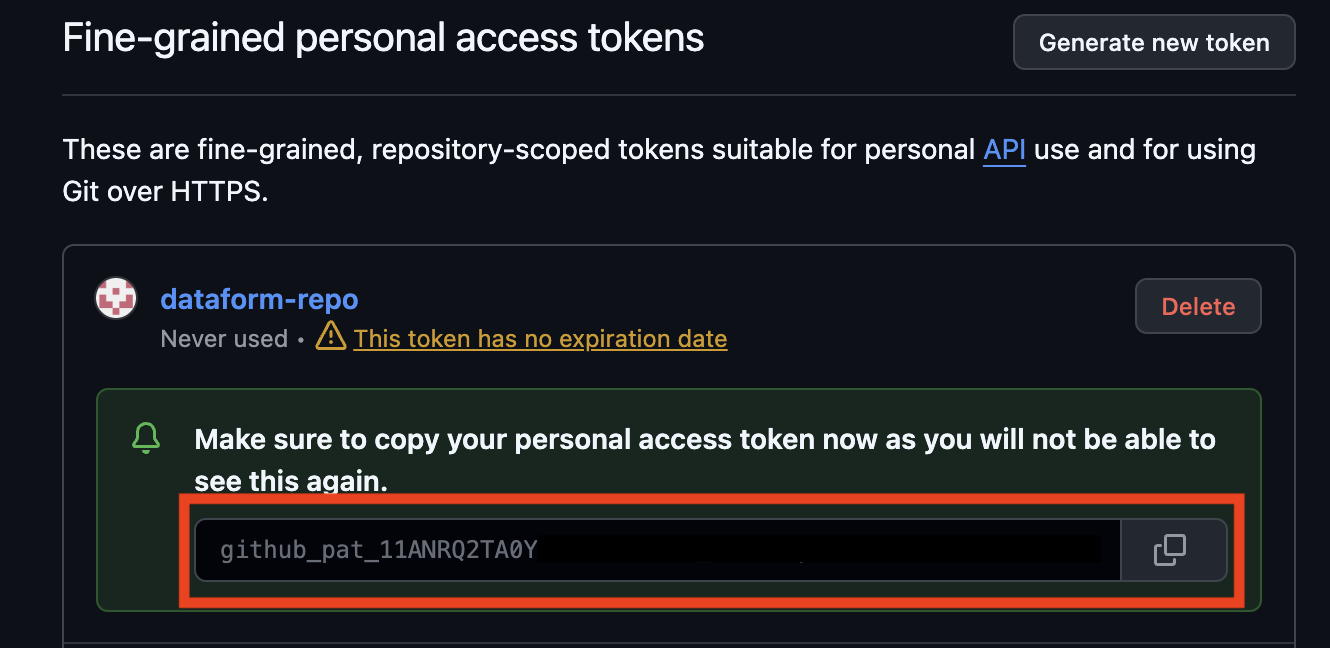
Copy the secret token you just created, you will need it later.
For now, the GitHub setup is complete.
Add Your GitHub Access Token to Google Cloud Secret Manager
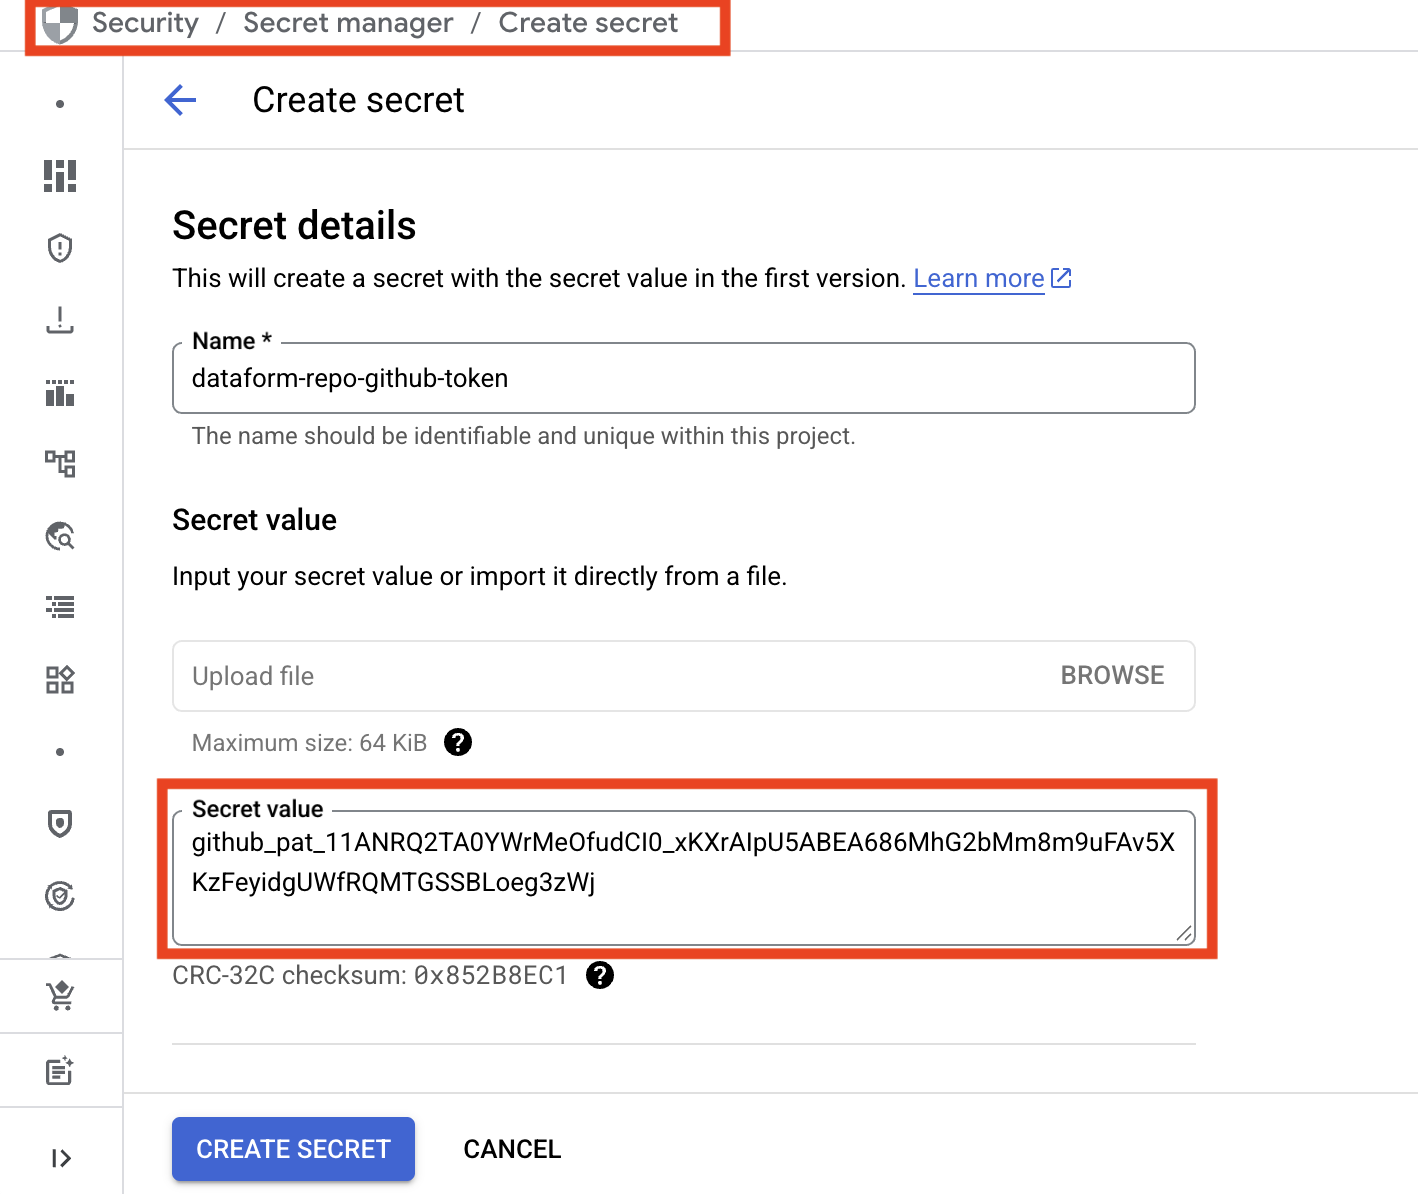
In Google Cloud, open the Secret Manager from the top menu. Click Create Secret.
Give the secret a clear and descriptive name, then paste the GitHub access token into the Secret value field.
Finally, click Create Secret.
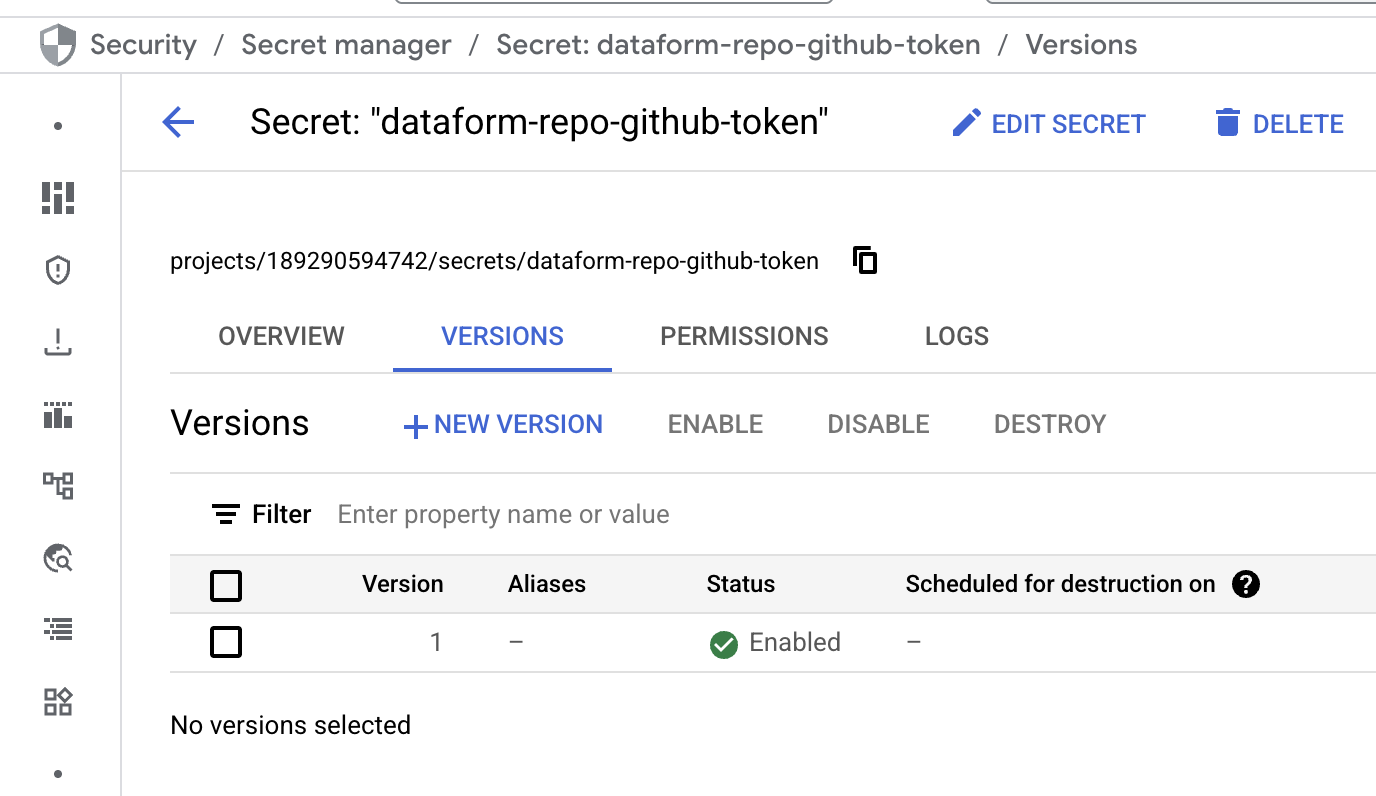
The GitHub secret is now stored in Google Cloud and ready to use.
Use the Secret to Connect Your Dataform Repository to GitHub
Return to Dataform and click the name of your repository to open it.
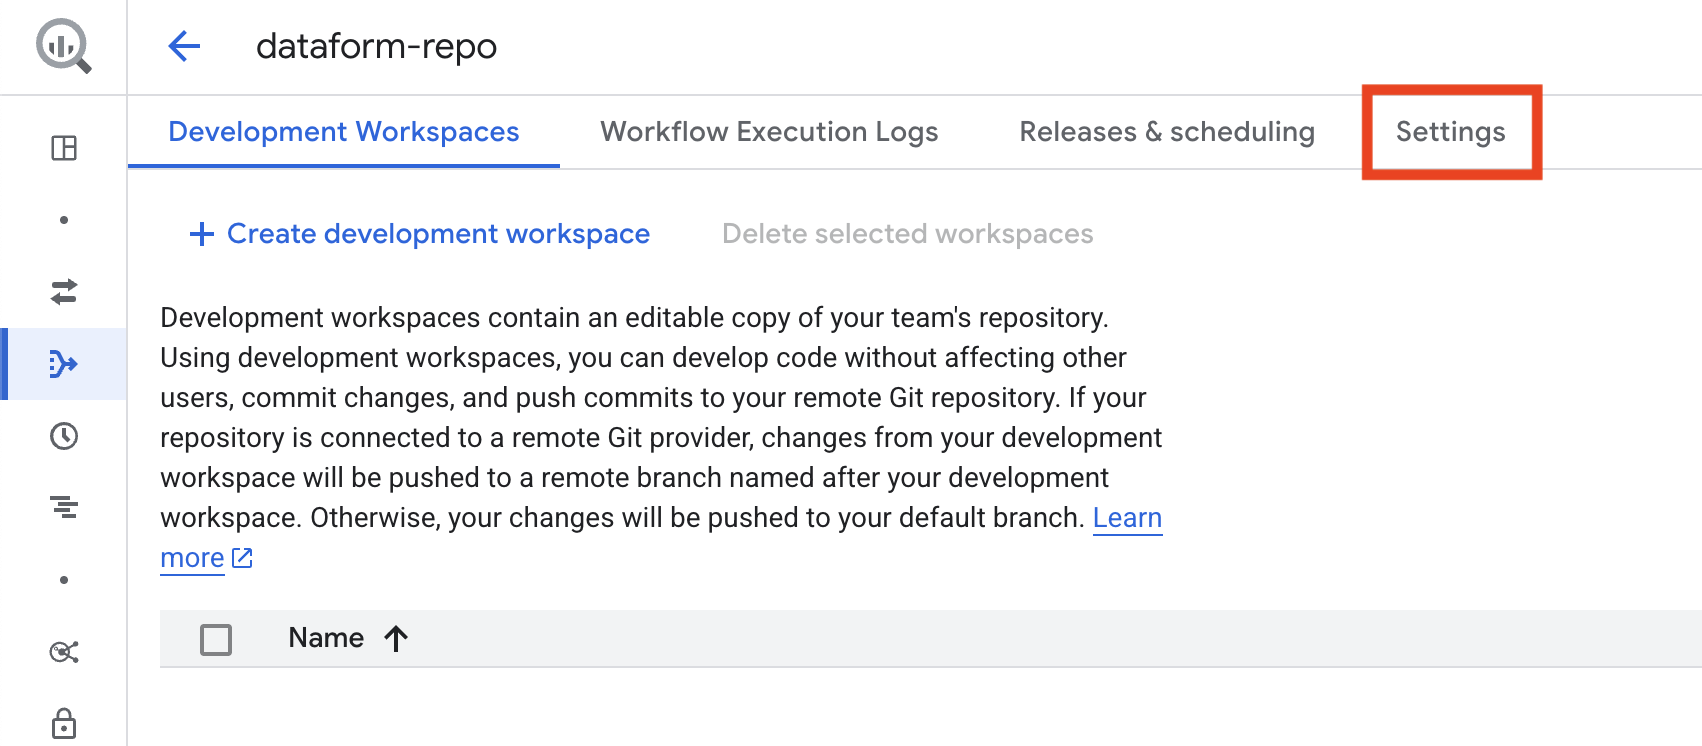
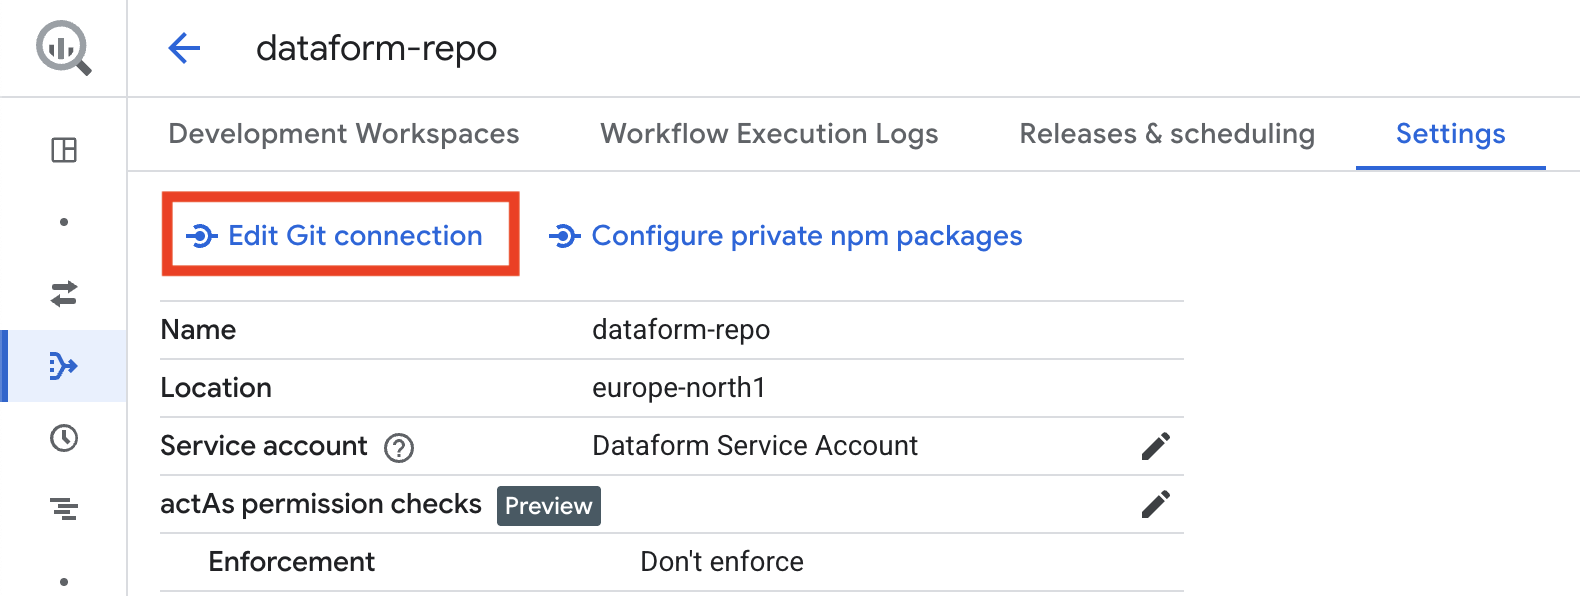
In your repository, go to Settings and select Connect with Git.
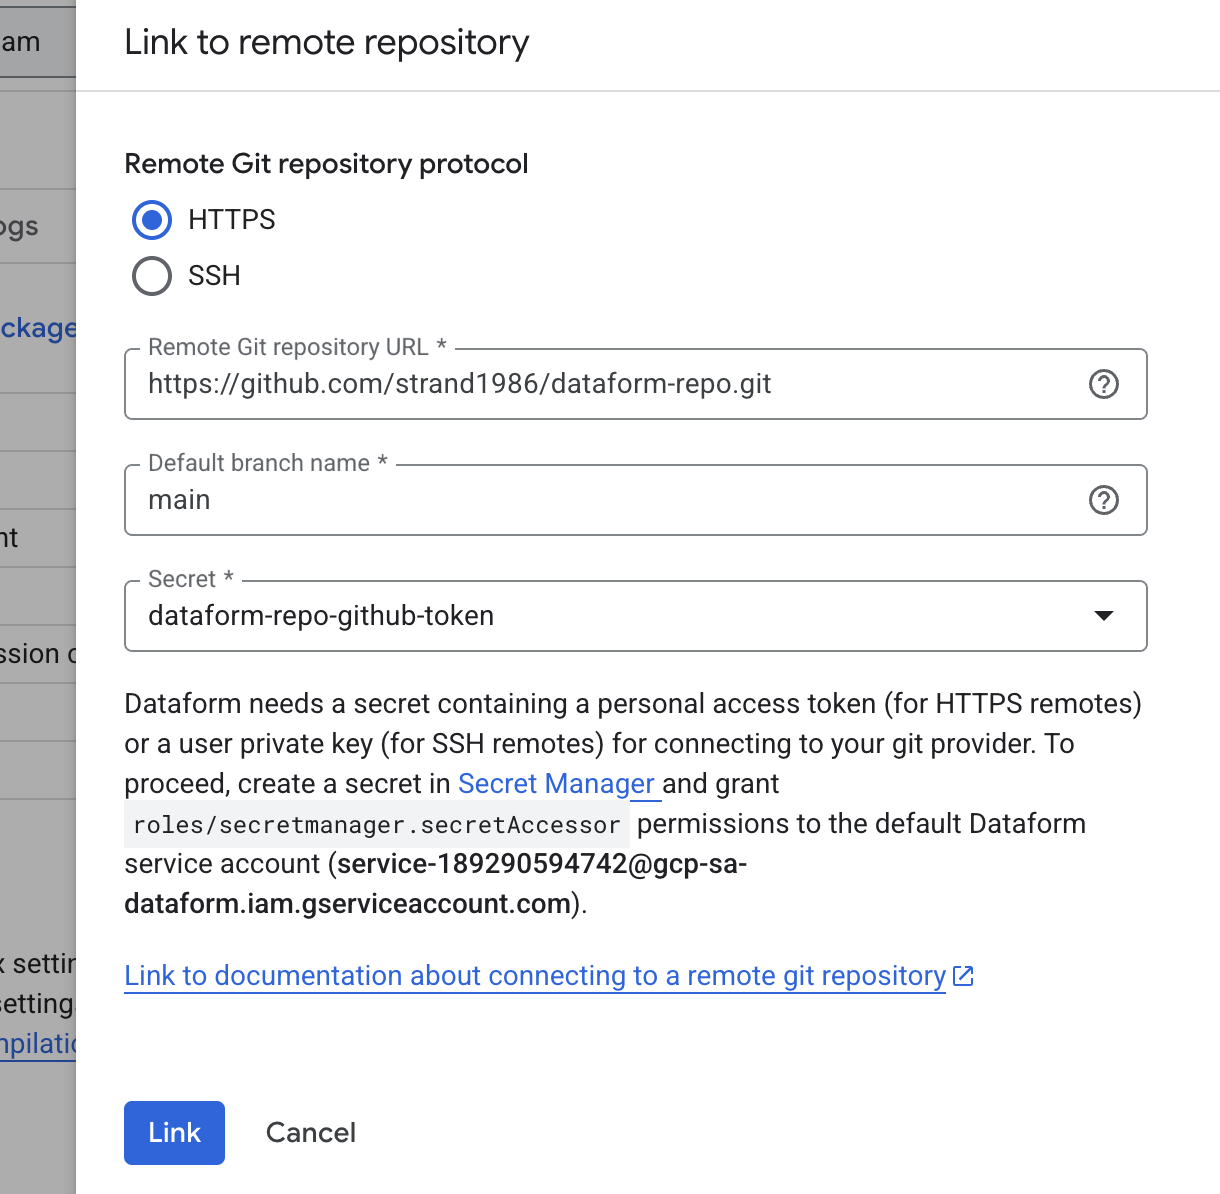
Choose HTTPS as the connection method.
For Git repository URL, enter the URL of the GitHub repository you created, making sure it ends with .git.
For Default branch name, type main.
For Secret, select the secret you created earlier in Google Cloud.
Finally, click Link.
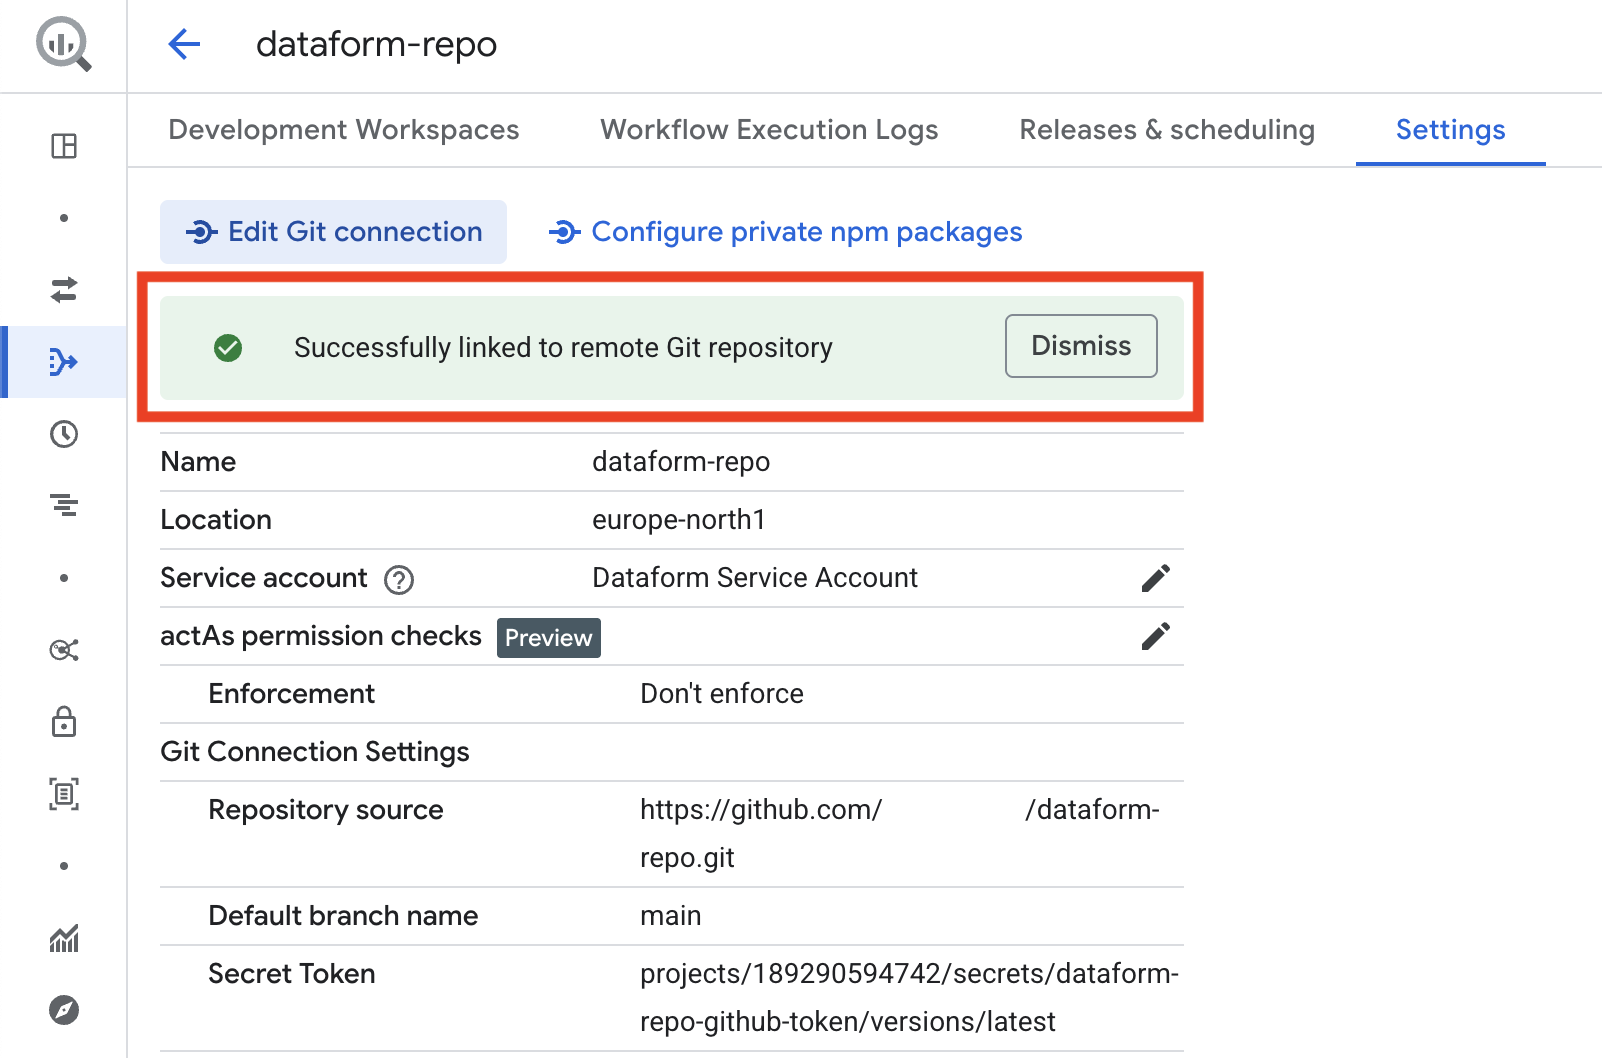
If everything worked, you will see a success message. If an error appears, double-check that your service account in Google Cloud has all the required roles, and confirm that the GitHub access token has the correct permissions for the repository.
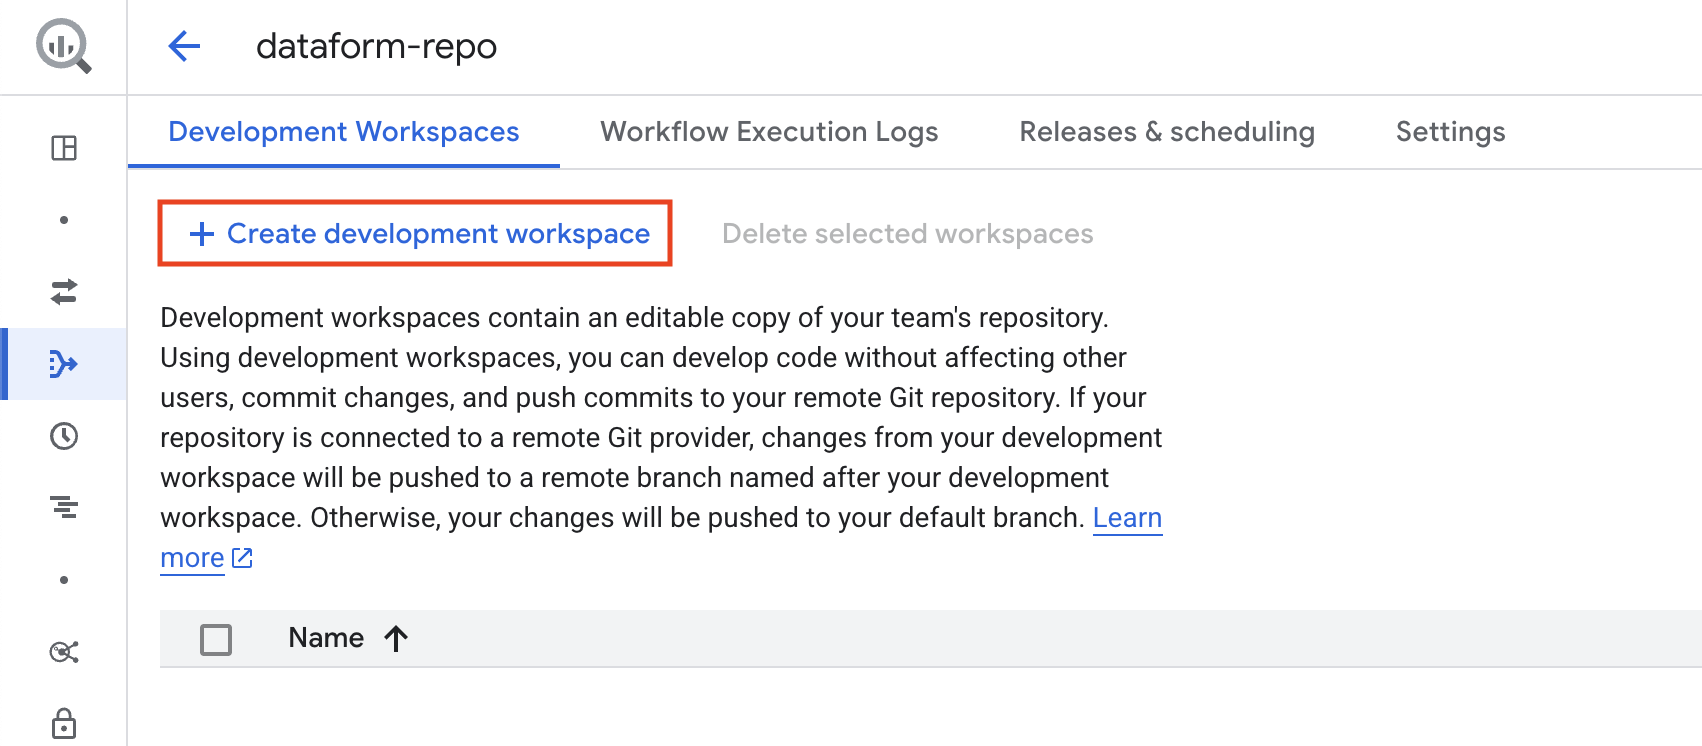
The repository setup is now complete, and you can start coding. If you haven’t already created a development workspace, click the button to create one before proceeding.
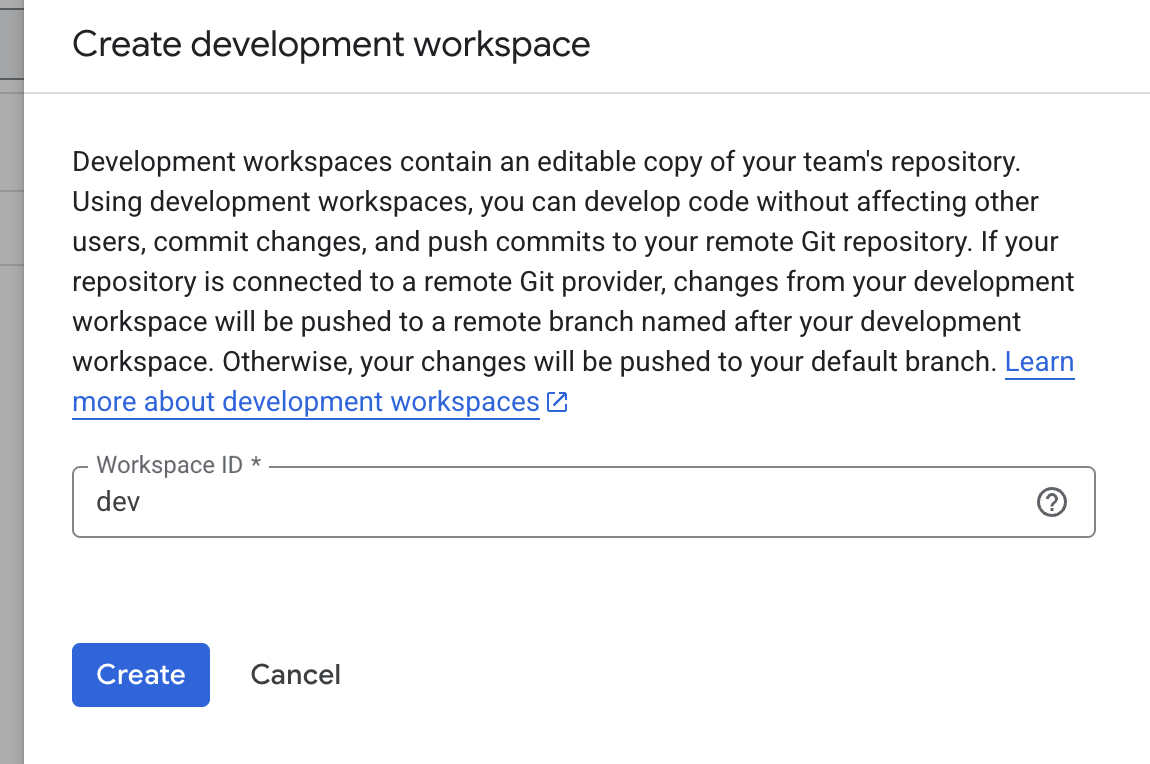
And give the workspace a suitable name.
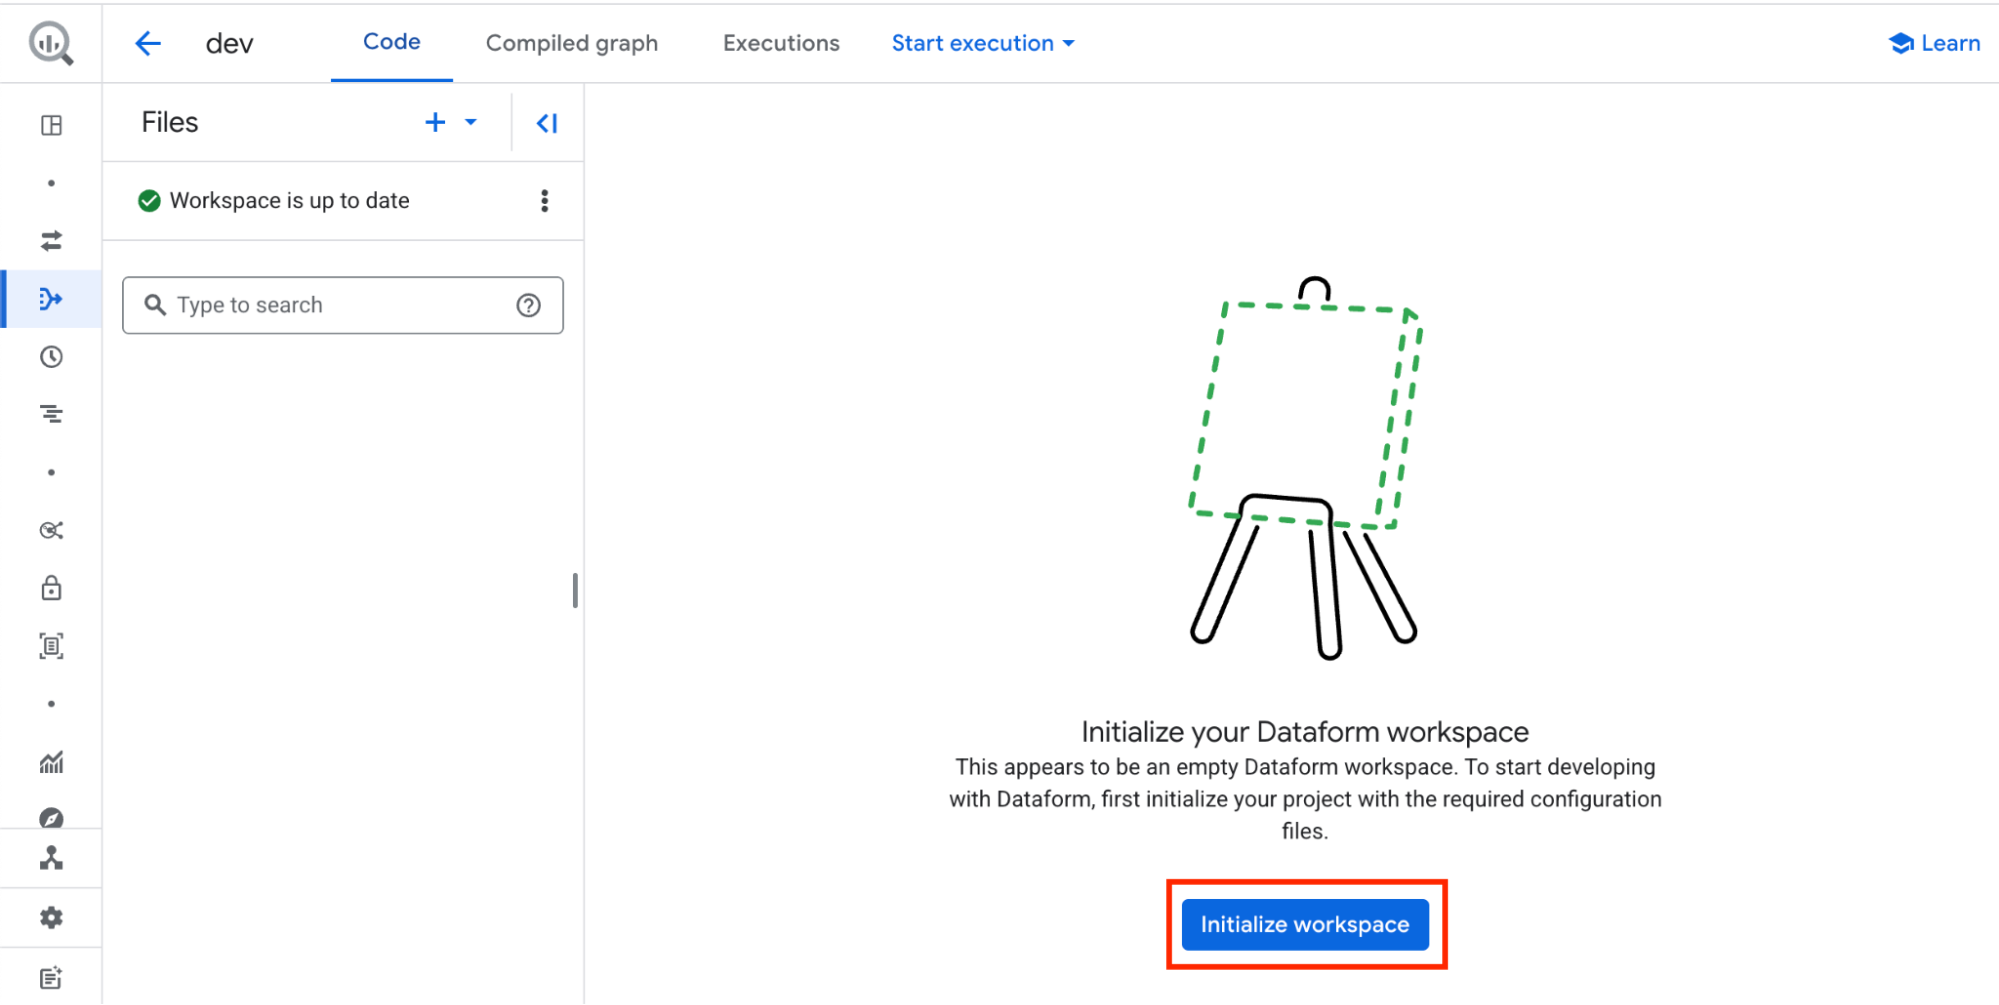
You are now inside your Dataform repository. The first step is to click Initialize workspace. This will load a basic project structure for you to start working with…
.. and generate a few basic SQLX files for us to get started.
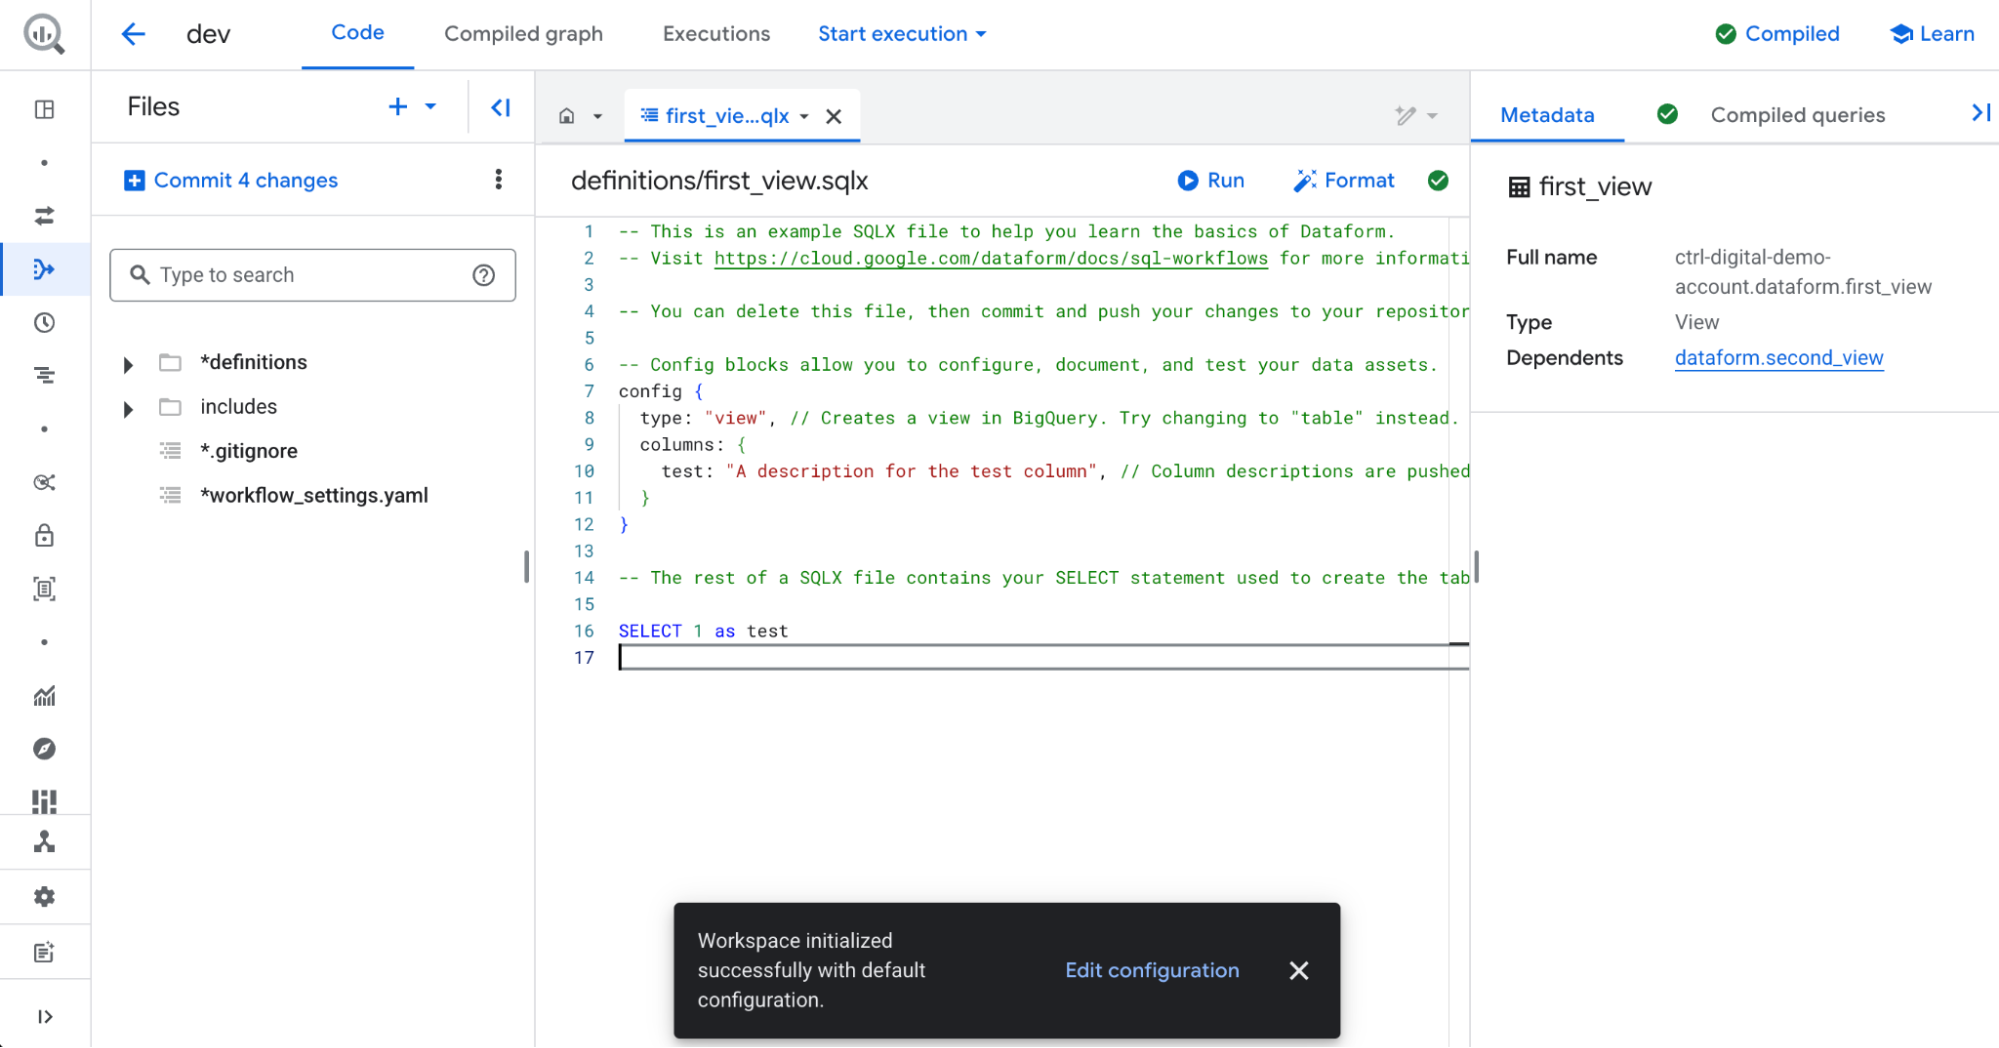
Exploring our new Dataform Repository
Files panel
On the left-hand side, you will find the Files panel. This is where you can organize your SQLX and JavaScript files into folders.
The definitions folder contains the SQLX and JavaScript files used to create new tables and views, as well as additional SQL operations such as deleting data from tables.
The includes folder contains JavaScript files where you can define variables and functions to use across your project.
SQLX files
An .sqlx file is where you write SQL transformations with added Dataform features. It’s similar to a normal SQL file, but with extra functionality:
- You can include JavaScript-style templating to make queries more dynamic (e.g. loops, variables).
- It defines tables, views, or incremental models that Dataform will build in your data warehouse.
- It supports configuration blocks (like type, tags, or description) that control how the output table is created and maintained.
In short, an .sqlx file is the main building block in Dataform projects, combining standard SQL with extra syntax for automation and easier data pipeline management.
workflow_settings.yaml
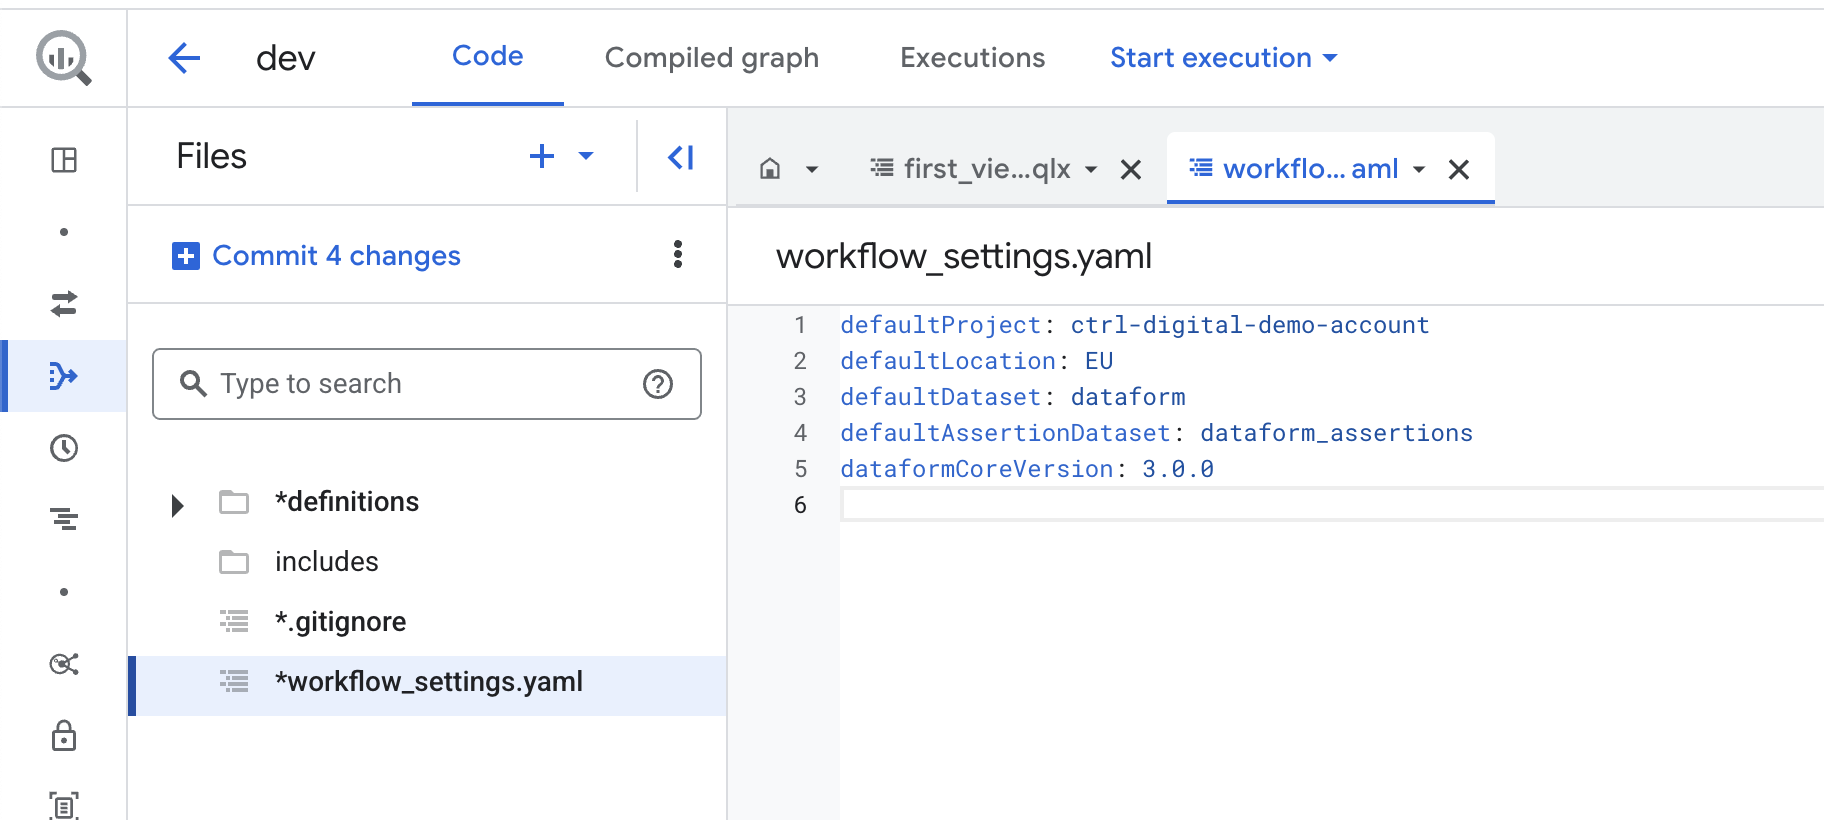
The workflow_settings.yaml file is a configuration file with settings that apply throughout your Dataform project.
Let’s take a look at the available settings in workflow_settings.yaml by clicking on it:
defaultProject: The default GCP project used when running queries. This usually remains the same, but if your BigQuery data is stored in a different project than your Dataform repository, you may need to change it.
defaultLocation: The default location where your SQL queries will run. This should match the location of your BigQuery data.
defaultDataset: The default target dataset for the results of your queries. You can override this setting in individual queries if needed.
defaultAssertionDataset: The BigQuery dataset where Dataform creates views with assertion results. By default, this is called dataform_assertions.
dataformCoreVersion: The version of Dataform to use. If a new version becomes available, update the version number here and then click Install Packages on the right side to update Dataform.
Our first SQLX file
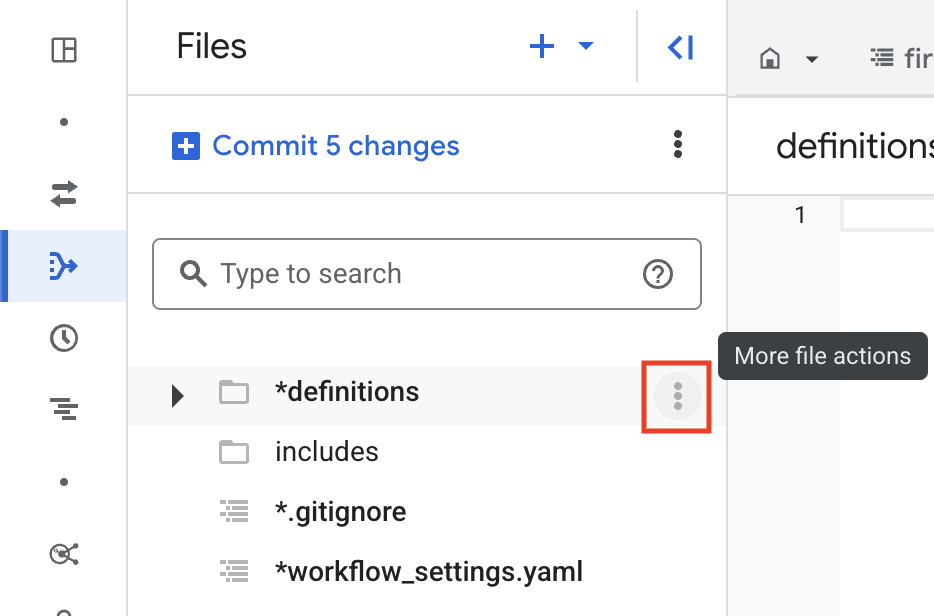
Now let’s create a new SQLX file and run it. To do this, click the three dots next to the definitions folder and select Create File.
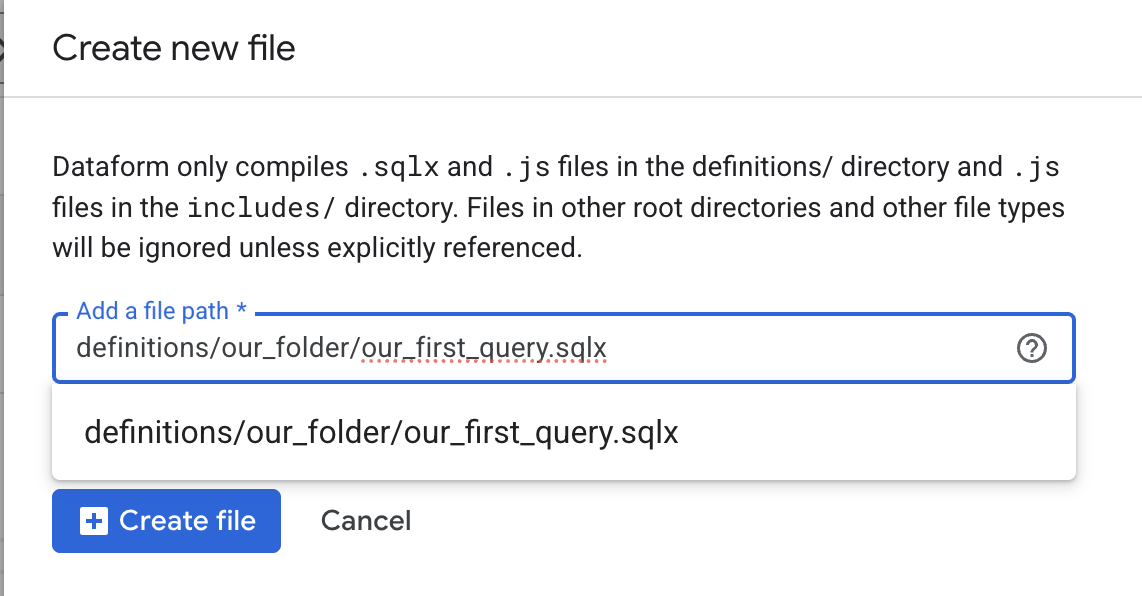
Give the new file a suitable name, making sure it ends with .sqlx. You can also create a new folder by entering the full file path, for example, if you write our_folder/new_file.sqlx, Dataform will automatically create a folder named our_folder under definitions.
Keep in mind that all SQLX files you want to execute must be stored inside the definitions/ folder or in a sub-folder to definitions/.
For demonstration purposes, we’ll write a simple SQL query in the new file. You can replace it with a more advanced query if you prefer.
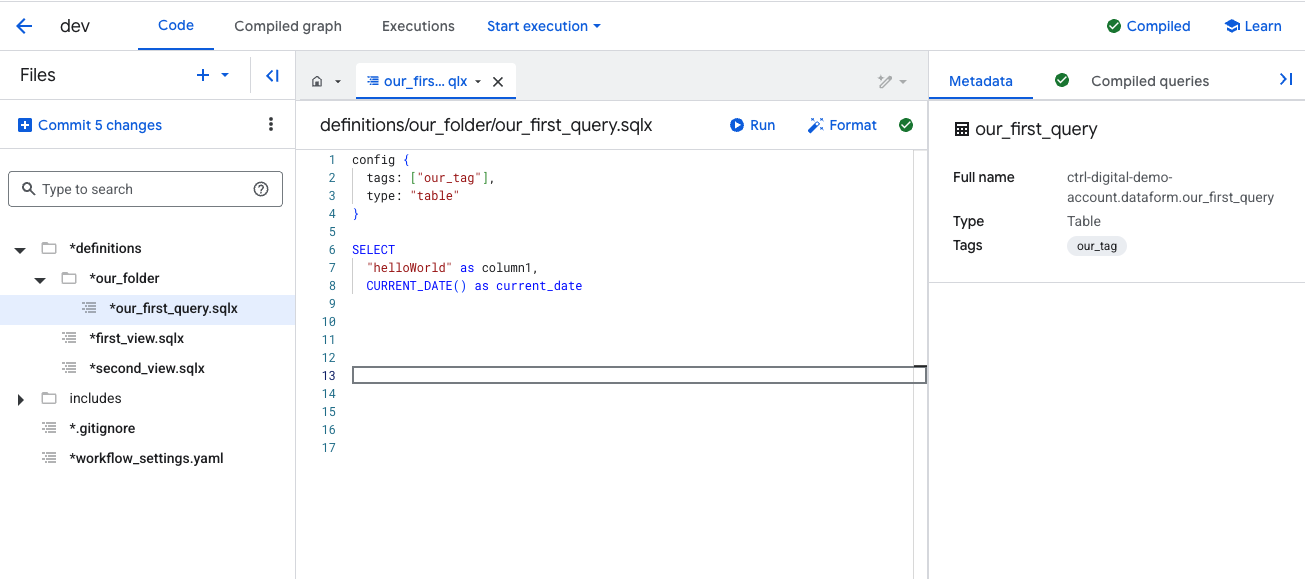
At the beginning of each SQLX file, you include a config block. This block defines additional rules and metadata that Dataform uses when executing the file.
Within the config block, you can add tags to control which files should be executed together.
You also define the type, which tells Dataform what to create. In this example, we’ll use table, which instructs Dataform to create a new table. Other options include creating a view, running an incremental update, or executing an operation such as deleting data. We will explore these options later.
On the right-hand side, you’ll see a panel with additional details about the query as well as the compiled SQL.
Metadata and Compiled Queries
Under Metadata, you can confirm details such as Full Name and Type. In this example, the query will create a table named our_first_query in the dataform.
The default project and dataset for new tables are taken from the workflow_settings.yaml file, specifically from the fields defaultProject and defaultDataset. If you don’t want to use those defaults, you can override them in the config block, we’ll cover that later.
By default, the table name is the SQLX file name. In this case, the file is named our_first_query, so the table created will also be called our_first_query. This too can be overridden in the config block if needed.
Running Queries in Dataform
At this point, you have three different options for running your query, depending on your needs. Let’s go through the first two of them, that we will mostly use during testing and debugging of our SQL code.
Run in Dataform Studio
The first option is the simplest, and works much like running a query directly in BigQuery Studio. The query runs instantly, and if the type is set to table, Dataform will create a temporary table and display the results right away.
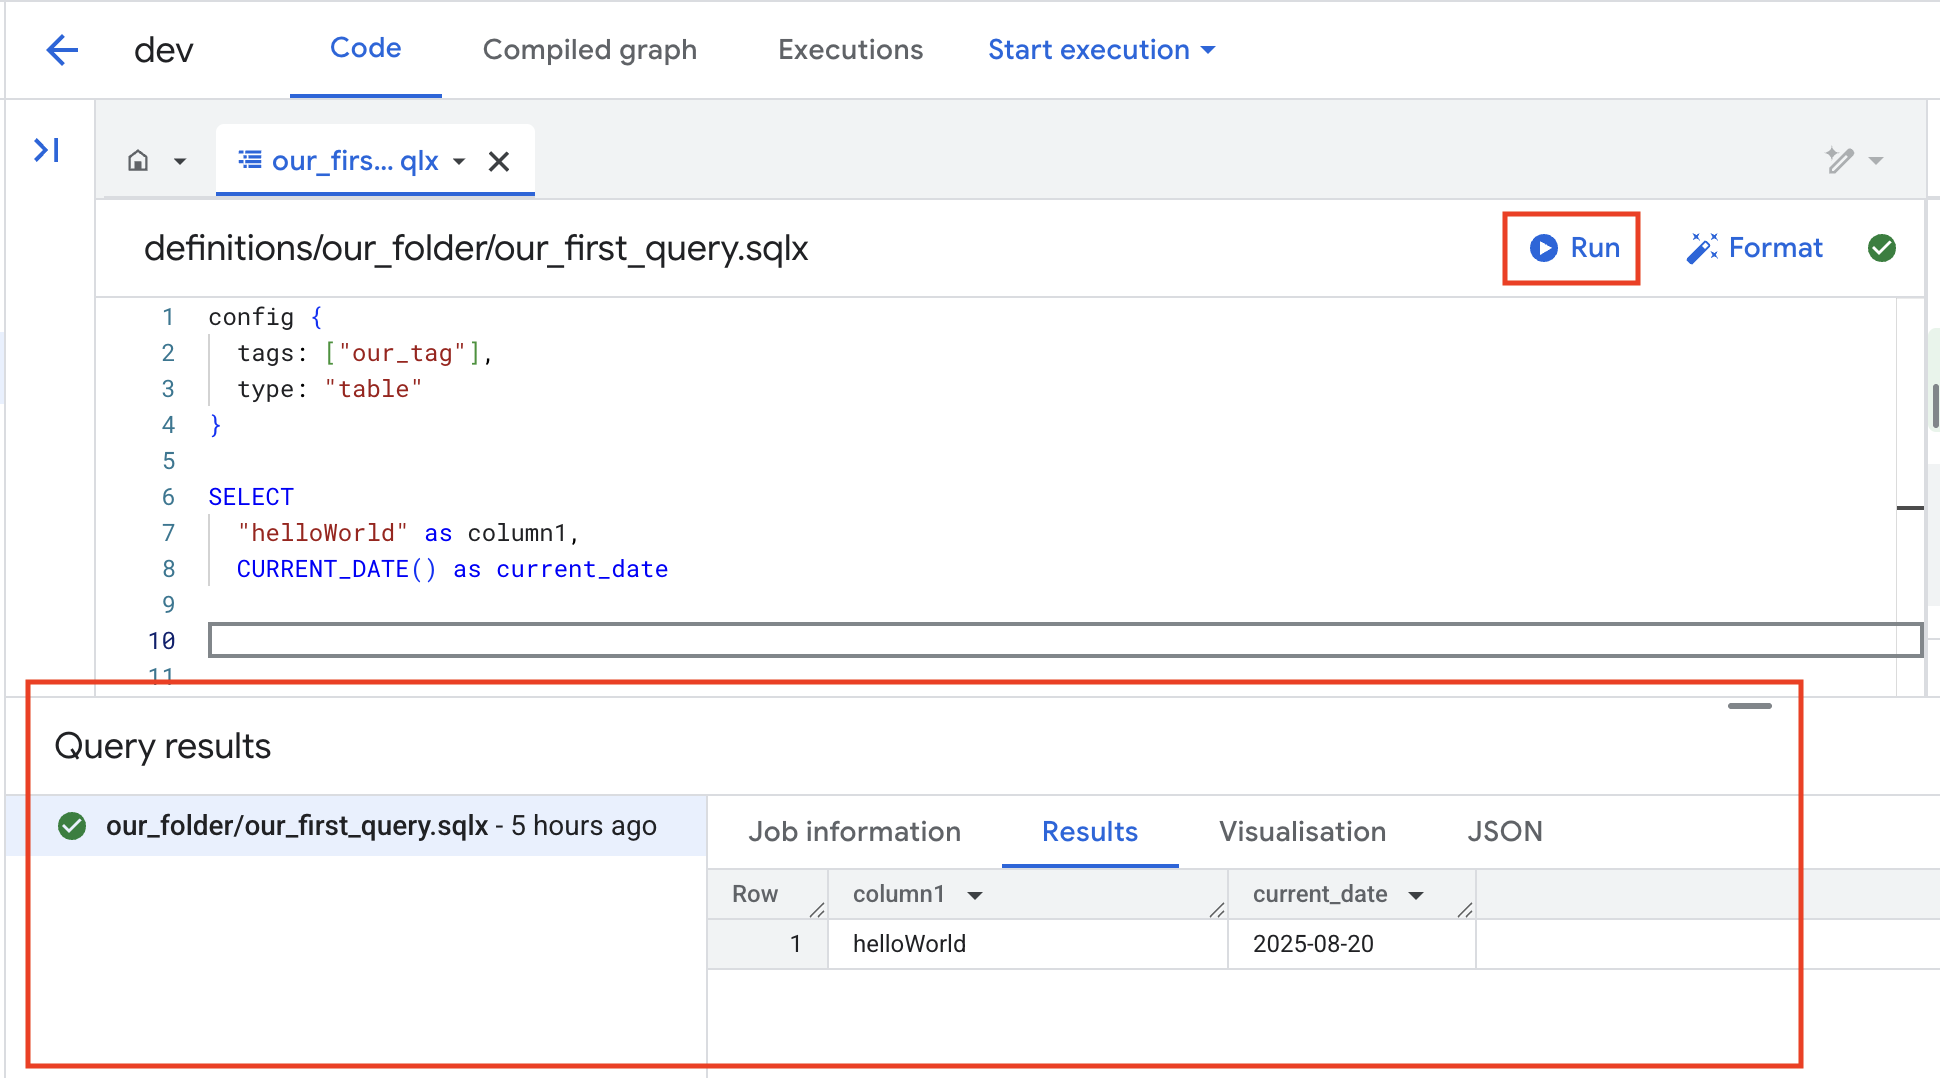
When you click Run, the query executes and the job details, along with its results, are displayed in the bottom panel.
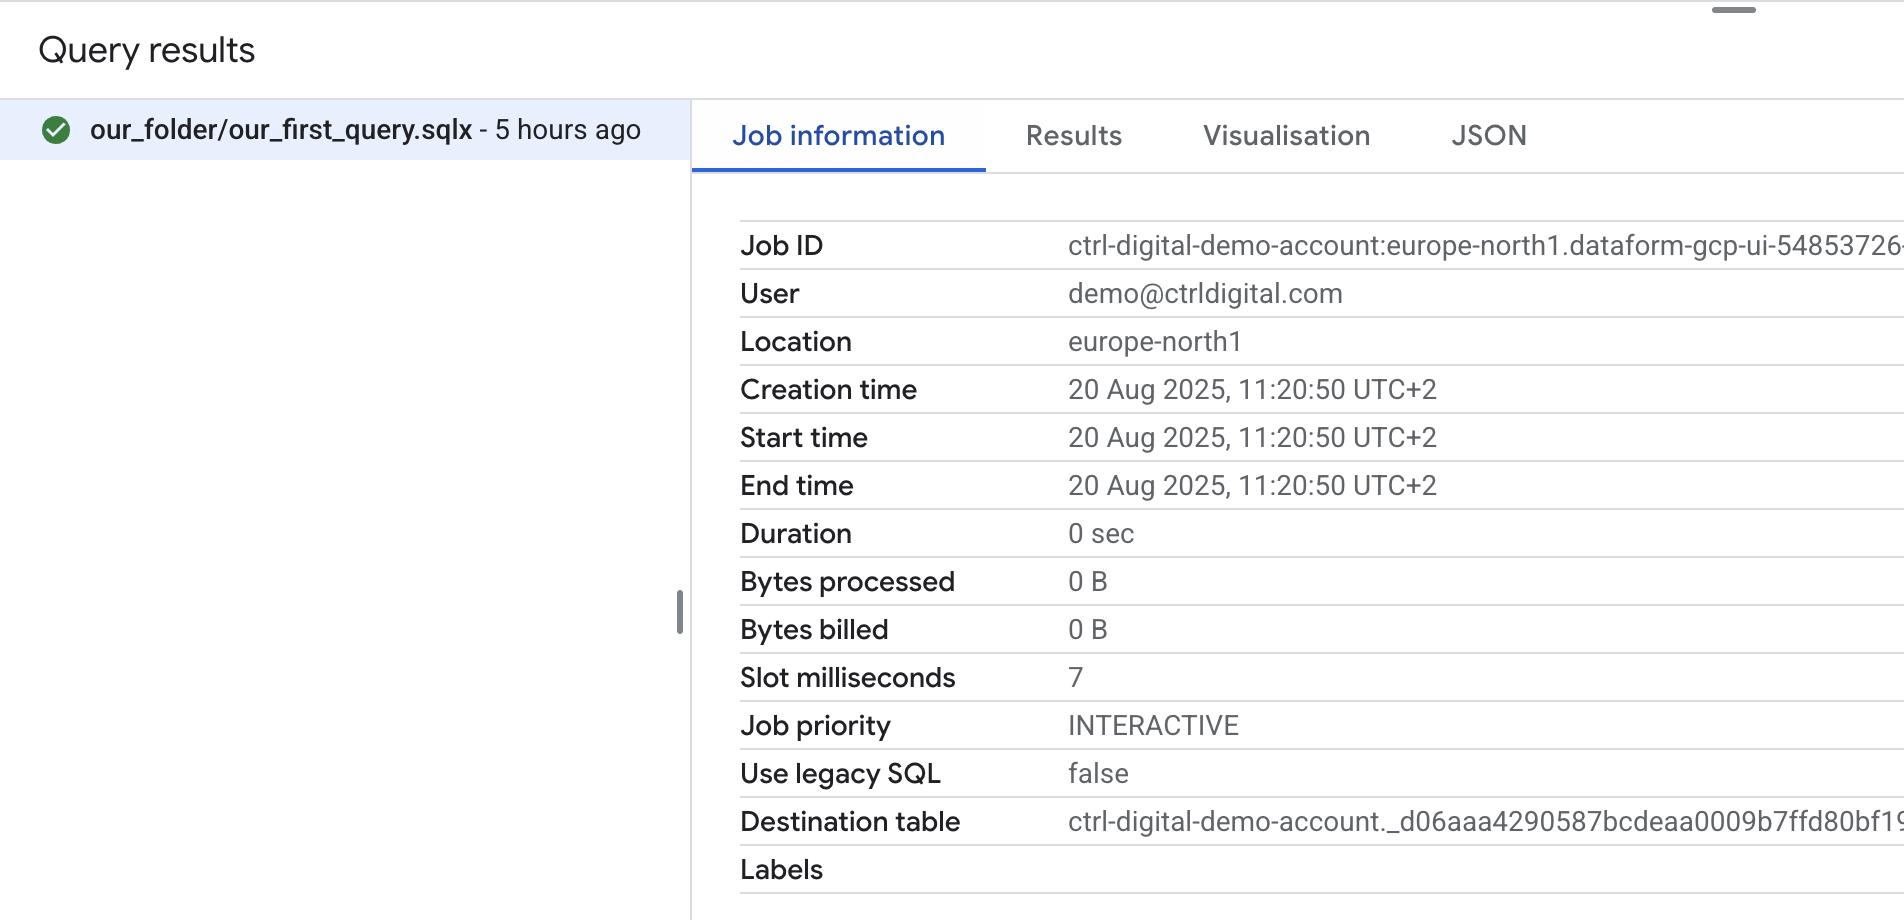
If you click Job Information, you can view additional details about the job, just as you would in BigQuery Studio. One important thing to note is that when you use Run, the query is executed with your personal account rather than the service account. This means you must also have the necessary access rights to any datasets and tables in BigQuery.
In practice, Run is best suited for quick tests while developing new queries. It’s fast but comes with limited options and capabilities.
Executions in Dataform Studio
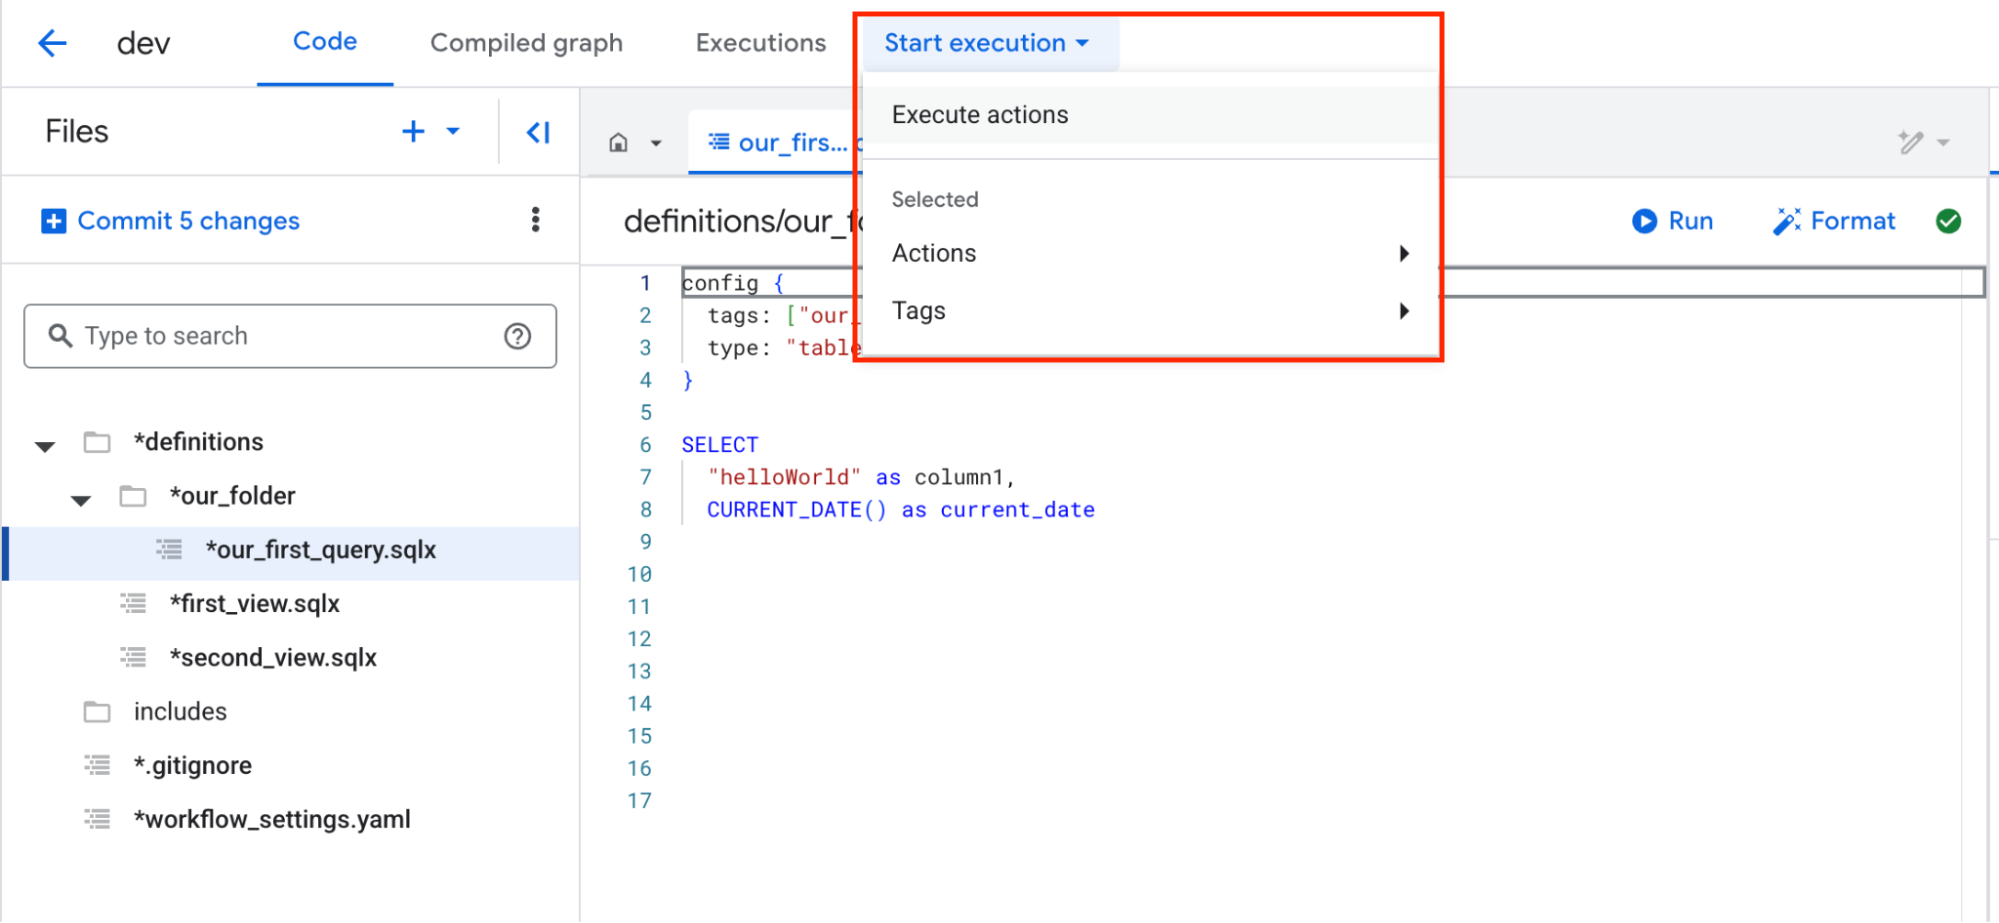
For more control, you should use Executions. By clicking Start execution and then Execute actions, you can run queries with more flexibility and better alignment with production workflows.
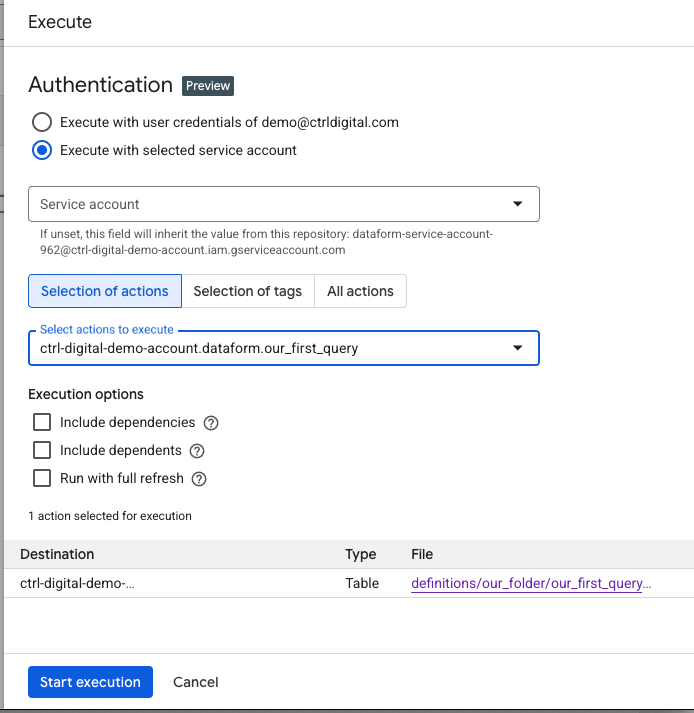
When you open the Execution panel, you’ll see several options.
For Authentication, you can choose to run the queries using your personal account or a service account. This time, we’ll use the service account to confirm that its access and roles are set up correctly.
For Selection of action, choose which SQLX files you want to execute. In this case, we’ll select the file we just created.
For Execution options, we’ll leave these blank for now since this is just a test run.
At the bottom of the panel, you can review the actions that will be executed based on the settings you selected. Here, we can confirm that a table will be created using our_first_query.sqlx and its specified destination table.
The Execute panel provides many additional options that we will explore in a future step.
Click Start execution to run the query.
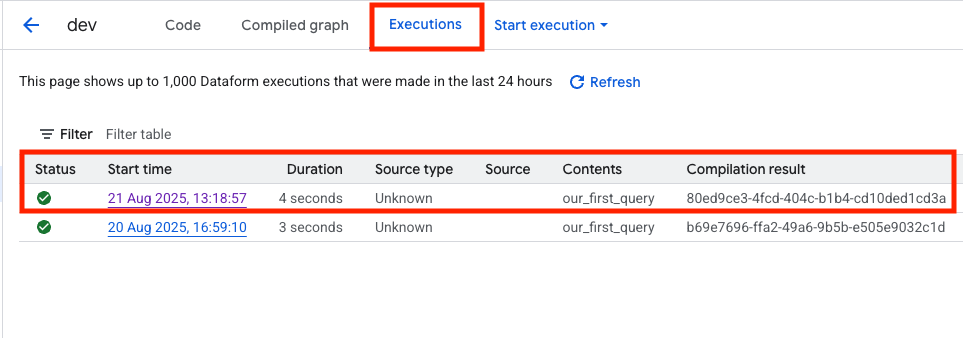
A popup will appear at the bottom saying Successfully created workflow execution. You can then click Details, or go to Executions at the top of the screen to view all executions in this Dataform repository. Although this view already provides plenty of information, you can click on the Start time of the execution you just triggered to see more detailed information.
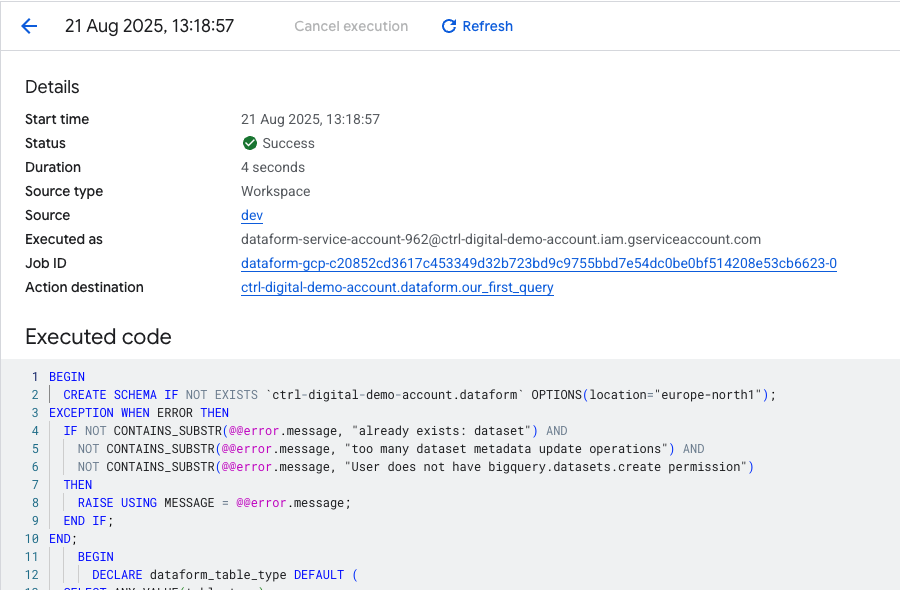
In the Execution info tab, you’ll find detailed information that can help debug your SQL workflows. Using the Job ID, you can open the execution in BigQuery to see more details, such as how many gigabytes the query processed, useful for monitoring and optimizing billing.
The Source field shows that the execution used the code from the current development branch (dev). Later, you’ll push this workspace to main so that executions in a production environment run against the main branch.
At the bottom, you can review the compiled SQL code generated from your SQLX file. It includes your SQL query, but it’s also wrapped with additional DML statements based on the settings in workflow_settings.yaml and the SQLX config block. For example, you’ll notice at the top that the query first checks whether the destination dataset exists; if it doesn’t, the dataset is created before the table is built inside it.
If everything was successful, you can click on Action destination to navigate directly to the table that was just created in the dataset called dataform .
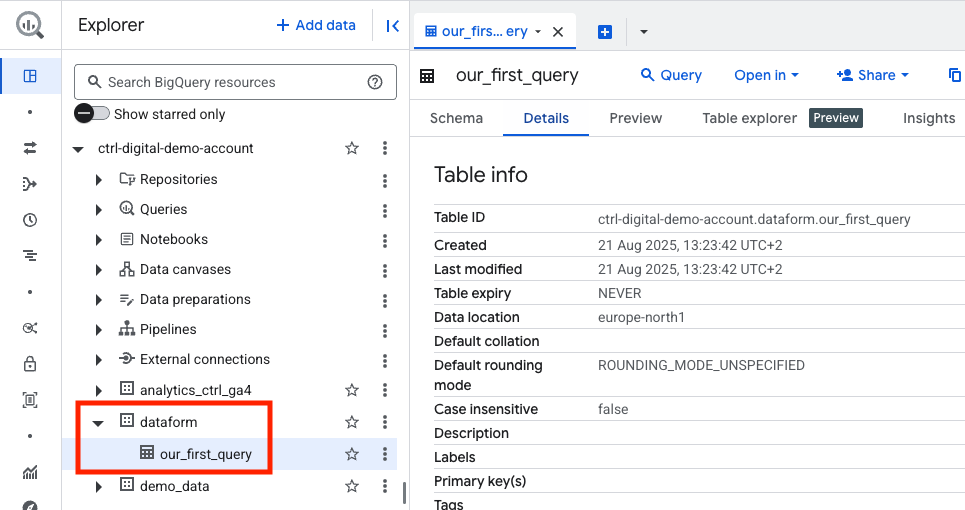
And that’s it. You have now successfully created a new Dataform repository, linked it to a GitHub repository for version control, and set up the service account with the necessary permissions.
From here, you can begin coding your SQLX files and building more complex workflows. In a later post, we’ll explore how to extend this further and schedule executions in a production environment.
